The bolt looks like a cylindrical rod with an external thread cut at one end. At the other end it ends with a head. The thread can be cut only on parts of the rod or all the way to the head. The appearance of the bolts will differ depending on their purpose. The article mainly examines the option of hardware with an internal hexagon, which is used in construction, the automotive industry, for assembling furniture, in components and mechanisms, and in wood.
Allen Bolt
How to replace a hex wrench
Fastening elements of many designs require the use of products with a certain type of head. A special place among them is occupied by bolts made with a hex key.
Very often such products are found in the furniture industry. Here they are worked with using keys type DIN 911. You can purchase them on many construction sites, where their main technical characteristics are indicated.
Main characteristics
A hex bolt is a type of fastening tool, characterized by an internal head in the form of several edges. This allows it to be made with the same diameter as the main rod.
Such bolts are used in various fields:
- the furniture sector is used to fasten several parts into one;
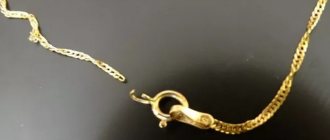
- complete set of plumbing mechanisms. The hexagon can often be found on the mixer, which secures the main handle, etc.;
All types of such fasteners also have a peculiar division according to standard sizes. For each of them, a corresponding key is standardized, often having a curved shape in the form of the letter “G”.
Welding hexagonal shape
Now all that remains is to weld the part into one. (In my case I used a 2.5mm welding electrode)
After this, you need to try on the nut again, and if everything fits, you can fill the cuts with welding. (3.2 mm electrode).
We try to put it on the nut again, because the high temperature during welding can deform the metal.
(This time I additionally tried the blank on the hexagonal protrusion on the filter.)
After this, you can clean up all the excess, making the shape of the part smoother.
We weld the lid
After sanding, place the piece on the sheet of metal from which the strip was made and trace its outline on it.
I chose to draw the line along the inside, adding a couple of millimeters along the edges. But you might want to outline the part around the outside, on the contrary, removing the extra couple of millimeters.
Then we weld the resulting upper part onto the previously made part. (We use 2.5 mm and 3.2 mm electrodes)
Let's check again if everything fits.
Pipe welding
Only after this step can the result of the work be called a tool.
Hexagon alternative
This type of fastener is very inconvenient to use in the absence of special tools.
There are several ways to replace a hex key:
- First of all, you can use a screwdriver of a certain size. In this case, you should rest its edges on opposite sides of the groove and try to turn or tighten the bolt.
- Bolt with a set of nuts. They are screwed onto the thread and placed inside the hexagon. In this case, tightening is done using a wrench. It should be noted that bolts and nuts must be selected according to the standard size of the hexagon.
- As a tool, you can use a triangular file of a specific size or an “asterisk”.
- If the design allows, you can cut a small hole in the hexagon for a flat-head screwdriver and then work.
It should be noted that unscrewing such a connection is somewhat easier than tightening it properly. For such cases, it is advisable to use a special tool. It is often sold in whole sets, which allows you to select it for any type of fastener.
If you need to remove the hexagon, you can cut off the head and knock out the bolt (if you have access). You can also turn the bolt by hitting a hammer and screwdriver along a certain edge of the product.
All these methods are not universal and can damage the hexagon design, which will lead to its replacement.
Thanks to this video you can learn how to quickly replace a hex key:
Features and Benefits
An internal hex bolt differs little from ordinary bolts in appearance, but, nevertheless, their minor design feature makes them more durable, reliable and convenient.
Advantages of hexagon socket bolts:
- To tighten the screw, there is no need for free space around the hardware because the key used to tighten the fastener is inserted directly into the head, rather than overlapping it.
- The slot on the head is not so easy to lick off; it is more durable compared to the slot of a regular bolt, since the material of the hardware is denser than the material of the key, and the key is more likely to deteriorate than the fastener slot.
- A hexagon socket wrench is cheaper than an open-end or socket wrench.
- The head of the fastener does not have sharp outer edges.
- Bolts with an internal hexagon are used in hard-to-reach places, and after screwing in, the head does not remain on the surface, but sinks flush.
Countersunk screw
- Galvanized hex bolt hardware can be used in wet conditions because they are more resistant to corrosion.
- Hardware of this type can be dismantled and used again, just like the structure itself assembled with their help. Bolts can be used in combination with a nut: in this case, they are inserted into the hole, and the nut is screwed on the other side; or without a nut, then they are screwed into a threaded hole.
How can you replace a hexagon at home?
Andrew Taylor (taylor.a), flickr.com CC BY
Fasteners in modern technology are distinguished by significant diversity. These include regular hex bolts and nuts, flat and Phillips slot screws, Torx sprockets and many others. Parts with an internal hexagon stand apart here. Unscrewing them without a suitable tool is quite difficult.
The internal hex spline first patented in 1936 by the German company Bauer & Schaurte. In foreign technical literature, such screws are usually referred to under the brand name Inbus. This is an abbreviation of the German phrase Innensechskantschraube Bauer und Schaurte - a hexagon socket screw from Bauer & Schauerte.
Advantages of internal hexagon
Hexagon socket bolts and screws have a number of advantages over conventional fasteners. Firstly, there is no need to leave space around the head with such a slot for the fastening tool. In this case, you can completely “recess” the screw into the part, which is very convenient for all kinds of drain plugs.
How to unscrew a hexagon: preparation
Whatever the reasons for the situation when the bolt stops unscrewing, the following steps should be taken before plumbing:
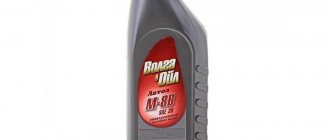
- Before unscrewing the hexagon, to reduce the coefficient of friction, it is necessary to open the bolted fasteners with lubricant such as WD-40, kerosene or brake fluid. You can start unscrewing the bolt 30-60 minutes after application.
- A stuck bolt can be gently tapped with a hammer so as not to further disturb the thread.
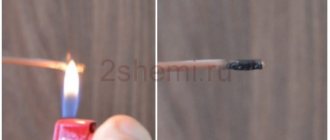
- If the location of the fastener allows, you can heat it with a gas burner so that the metal becomes more pliable and rust and dirt turn into ash.
Preliminary preparation
First, it is imperative to carefully prepare for the further implementation of the entire complex of events. First you need to prepare all the necessary tools. You also need to select a rod of the highest quality so that it is able to withstand the load that the hexagon takes on during operation.
So, all the most necessary cutters should be at the workplace. Of course, you can’t do this without a lathe. The work ahead is delicate, so you should choose the highest quality cutters. Now it’s time to prepare a stencil that will mark the side face of the hexagon. After all, you will have to make a full-fledged tool from a round shaft. You will need a brush to remove excess iron filings.
These are all the preparatory works that need to be done before further work can be carried out.
Return to contents
How to unscrew a broken hex bolt
To unscrew a protruding hex or star bolt, you can use the following methods:
- Using a hacksaw or a grinder, make a neat and clearly vertical cut across the screw head. After these steps, you can unscrew it with a regular flat-head screwdriver.
- Using a Torx star: you need to drive it into the recess for the hex key in the hardware head. The size of the sprocket should be such that its splines do not fit into the hole. Then the hardware is unscrewed with a sharp jerk. It is not recommended to use a Torx with a hole in the center; the sprocket can break off.
- Before unscrewing the hexagon with torn edges, a drill with drills and extractors is used to drill a hole in its center. After this, the extractor is driven into it, then pulled out with pliers along with a hex screw.
- Using a drill with reverse rotation, a thin hole is drilled, then a hammer is inserted into it with left rotation and the fasteners are unscrewed. In this case, the rotation of the drill should be slow and the pressure should be strong.
Step by step: DIY hexagonal wooden gazebo
We continue our traditional series of articles from Yuri Voedilo (professional builder and repairman). Yuri writes:
In private sectors and at dachas it has become fashionable to build gazebos for relaxation. The time has come for us to build such a wooden gazebo. From the beginning we need to decide what kind of gazebo we want, in what place the gazebo will be, what shape and size it will be, and what we need it for.
For outdoor gatherings with guests at the dacha or in a private house, for a barbecue with the family, or just to keep the rain from dripping on our heads while we are lying in a hammock. It will be especially pleasant to relax in a gazebo built with your own hands. Our customer requested a semi-open wooden gazebo on a concrete base, hexagonal in shape.
Such a gazebo will be compact and able to accommodate quite a lot of people due to its shape, looks beautiful, and due to its design and concrete base, such a gazebo is stable and durable.
And so during work we cannot do without such a tool as:
- Tape measure and square.
- Wood saw and axe.
- Brushes for painting.
- Jigsaw, electric saw (parquet) or grinder.
- Screwdriver.
- Hammer.
- Level, plumb.
And naturally we will need material:
- Beam with a section of 15 by 15 -12 meters.
- Boards 3 by 12 - 80 meters.
- Beam 5 by 15 - 60 meters.
- Paints and varnishes.
- Wood screws 15 mm, 30 mm, 50 mm, 150 mm long,
- OSB with a thickness of at least 15 mm – 45 m2.
- Metal corners 50 by 50 mm - 12 pcs.
- Reinforcement with a diameter of 8 mm 2 meters.
Stage 1. Preparing a concrete base for a wooden gazebo
At the beginning of building a hexagonal gazebo with your own hands, you can make the shape of the concrete base absolutely any hexagonal, square or even round. It doesn't matter. The main thing is that the site is slightly larger than the gazebo of your intended size. And she could freely fit and stand on the site.
I wrote about how to pour a concrete floor in the article: Do-it-yourself professional floor screed step by step. https://o-builder.ru/professionalnaya-styazhka-pola-svoimi-rukami-poshagovo/
I think it’s not worth repeating since the technology is absolutely the same. The only difference is that you will pour the concrete not in the room, but in a hole 15-20 centimeters deep.
Stage 2. Preparation of material and marking of a hexagonal wooden gazebo
Let's start the construction of a hexagonal gazebo for a summer house with racks; we should have six of them, 15 by 15 centimeters thick. All are strictly the same height, at least 200 centimeters. The ends must be cut at an angle of 90 degrees. We treated all the racks below with resin so that they would draw less moisture from the concrete base. We painted all four sides with a wax-based pigment, and in the spring we will cover the top with clear varnish. We treated all the wooden parts of the rafters, sheathing and even OSB with the same pigment. The truth is on the one hand, the one that will be towards the bottom.
Now, on the finished base, you need to draw a circle the size of our gazebo. And so that the circle comes out even, we’ll make something like a large compass. Let's take two pegs and tie them with a rope. We will place one peg in the center of the site and draw a circle the size of our gazebo. To get a regular hexagon, you need to measure a distance from any point of the resulting circle equal to the radius of the circle. So we will get six points; these will be the very points where we will place the already prepared gazebo posts.
How to unscrew an internal hexagon with torn edges
To unscrew a bolted connection with a through hole, you can use a file. With its help, the hexagonal hardware is bored to the next size and unscrewed with a wrench.
The second way is to use Torx. They can punch out new splines and reuse the hex hardware, but subsequently it can only be unscrewed with a Torx sprocket.
Torx sprockets
In addition, before unscrewing the torn hexagon, you can saw through the internal axis of the hexagonal fastener for a screwdriver and unscrew it. With this method, it is not always convenient to get to the fastener; sometimes its location does not allow the use of a screwdriver.
Tools and materials
Yes, the hexagon is a rather difficult tool to implement. It has a regular, but not quite standard shape, so it is not so easy to make. In most cases, it is much easier to go to the nearest store that sells the tool. A tool like this isn’t that expensive to save on. However, if you need a tool urgently, and it’s already night outside, then in most cases it will not be possible to purchase a tool. You'll have to do it yourself. To work you will need the following:
Drawing of a hexagon in a circle.
- a measuring tool, without it there is no way in this matter, because you will have to get the correct hexagonal shape, and this is not so easy;
- metal rod made of steel 45;
- incisors;
- Sander;
- sandpaper.
Basically, this is quite enough to carry out the entire range of work.
Return to contents
How to unscrew a hex without a key
Other ways to unscrew a bolt without a hexagon are as follows:
- If the size of the bolt is not too small, you can use a chisel or an ordinary hammer: they strike at an angle in the direction of unscrewing the fastener.
- Method using a spanner or gas wrench.
- If you have a problem with how to unscrew a “licked” hexagon, you can use a wrench with an attachment. The bolted connection is unscrewed using a hammer mechanism.
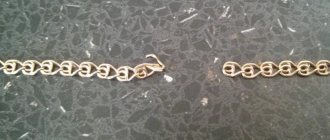
- Method of using welding: a small amount of metal with a nut or any piece of reinforcement is welded to the fastener, with the help of which it is then unscrewed.
- The extreme measure for unscrewing hex hardware with an internal axis is to completely dismantle the fastener, when cuts are made with a hammer and the fastener is disassembled.
Cutting metal strip
The first thing to do is measure the length of the edge of the hexagon for which you need to make a key.
We multiply this size by six (the number of edges), and we get the length of the metal strip that needs to be cut.
I recommend adding 6 mm to the resulting length (which I didn’t do), then it will be easier for you at the next stage of manufacturing.
The plate should be wider than the height of the bolt for which you are making the key (a couple of millimeters is enough).
When everything has been measured, cut off the strip.
Next, draw lines on it, between which there should be a distance equal to the length of the edge plus one millimeter.
Then you need to make cuts along the lines, going deep to 2/3 of the thickness of the plate.
The result should be a strip of metal that looks like a chocolate bar.
How to unscrew a hexagon: preparation
Whatever the reasons for the situation when the bolt stops unscrewing, the following steps should be taken before plumbing:
- Before unscrewing the hexagon, to reduce the coefficient of friction, it is necessary to open the bolted fasteners with lubricant such as WD-40, kerosene or brake fluid. You can start unscrewing the bolt 30-60 minutes after application.
- A stuck bolt can be gently tapped with a hammer so as not to further disturb the thread.
- If the location of the fastener allows, you can heat it with a gas burner so that the metal becomes more pliable and rust and dirt turn into ash.
Preparatory activities
If the edges are torn off, you can unscrew the bolt only after preparatory work. The work must be carried out without fail, regardless of the reasons that provoked a violation of the integrity of the fastening element.
- It is much easier to remove a damaged bolt or nut if you first apply a penetrating liquid (like WD-40) to the product, which reduces the level of friction. After applying such a solvent to the threads, you can start working in about 1-1.5 hours. It is noteworthy that it is not necessary to use expensive products, since a special penetrating liquid can be replaced with kerosene or brake fluid.
- Before unscrewing a bolt with a torn head, it is necessary to subject it to a certain load, that is, gently tap the stuck fastener with a hammer. As a result of such manipulations, the durability of the bolt will decrease, which will simplify the task of removing it. According to the design, you should not hit it too hard so as not to deform the fastener.
- Depending on the situation and location of the fasteners, you can try to heat the stuck bolts using a gas torch. This will remove rust and dirt, turning it into ash, and will also warm up the metal and make it more pliable. You can also use a set of spanners, a grinder, a file or a welding machine.
It is quite good if there is space near the problematic connections, thanks to which you can use an adjustable wrench or pliers when unscrewing. It is important to take care of the condition of the auxiliary materials so that they are in good working order, since when working with bad tools the situation can only get worse.
How to unscrew a broken hex bolt
To unscrew a protruding hex or star bolt, you can use the following methods:
- Using a hacksaw or a grinder, make a neat and clearly vertical cut across the screw head. After these steps, you can unscrew it with a regular flat-head screwdriver.
- Using a Torx star: you need to drive it into the recess for the hex key in the hardware head. The size of the sprocket should be such that its splines do not fit into the hole. Then the hardware is unscrewed with a sharp jerk. It is not recommended to use a Torx with a hole in the center; the sprocket can break off.
- Before unscrewing the hexagon with torn edges, a drill with drills and extractors is used to drill a hole in its center. After this, the extractor is driven into it, then pulled out with pliers along with a hex screw.
- Using a drill with reverse rotation, a thin hole is drilled, then a hammer is inserted into it with left rotation and the fasteners are unscrewed. In this case, the rotation of the drill should be slow and the pressure should be strong.
Step-by-step instructions for unscrewing the hexagon
There are several options for step-by-step instructions for unscrewing a hexagon.
- On a bolt with a protruding hex head, the head is cut using a grinder or a hacksaw. It can then be unscrewed using a regular screwdriver. The cut must be made with the utmost care so that the screwdriver does not jump off it during operation.
- A suitable Torx sprocket is driven into the place where the hexagon is inserted. When driven in, it cuts through the head with splines and inserts into it. The bolt is pulled out with a strong jerk. If unscrewing is carried out slowly, the splines will break and the operation will have to be done all over again. Torx with a central hole cannot be hammered, since when hammered it is destroyed.
- Unscrewing the hexagon can be done using a drill and a regular drill, and various extractors that are purchased in the store. Using a core, a future drilling point is marked strictly in the central part of the bolt being processed, at which a hole is then drilled. With a little force, an extractor is inserted into the resulting hole with a hammer. Then, using a handy tool, it is unscrewed. The extractor can be reused after this procedure.
- Can be unscrewed with a drill with left rotation and a construction drill with reverse. A drill with a thin diameter drills a hole in the head of the element. Then a drill of a smaller size is taken compared to the diameter of the damaged bolt. The drill is inserted into the drill and set to inverse rotation. The speed of the drill should be low and the pressure strong. When the element is pressed firmly, the drill will screw into it and pull it out.
A bolt or hex screw can become damaged at any time. Various available tools can help in its repair, but the use of special tools may be required, without which it is impossible to unscrew the hex head of the damaged element.
Therefore, it is important to know all currently available methods for repairing this element. The hexagon is found in various types of indoor water faucets, in car spare parts
At the moment, these bolts are considered quite convenient fasteners, so they are widespread and found in many mechanisms.
Their use is advisable where a reliable power connection is required. This type of fastener is perfectly adapted to high loads and significant physical pressure. These bolts are especially often used in industries such as construction and mechanical engineering.
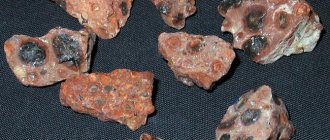
If we turn to the process of creating a hexagon, it becomes clear that the process of their manufacture is long and quite labor-intensive. These bolts are made from steel wire rod, which then softens after being in a hot oven for a long time. Then the wire rod is placed in a sulfuric acid solution for some time to completely remove rust particles. After being washed with water and treated with phosphates, the steel becomes resistant to rust and is then sent to be formed into a hex head element.
In the process of creating these products, many people are involved, providing the Russian market with modern, high-quality fasteners.
How to unscrew an internal hexagon with torn edges
To unscrew a bolted connection with a through hole, you can use a file. With its help, the hexagonal hardware is bored to the next size and unscrewed with a wrench.
The second way is to use Torx. They can punch out new splines and reuse the hex hardware, but subsequently it can only be unscrewed with a Torx sprocket.
Torx sprockets
In addition, before unscrewing the torn hexagon, you can saw through the internal axis of the hexagonal fastener for a screwdriver and unscrew it. With this method, it is not always convenient to get to the fastener; sometimes its location does not allow the use of a screwdriver.