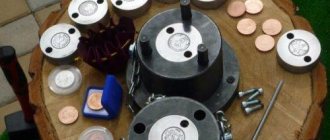
With the right approach, making souvenir coins (minting) can become a permanent source of income and quite a profitable business. Such souvenirs are purchased with pleasure by tourists, collectors, and vacationers. The coins depict the name of the city, its attractions, historical and solemn events, names, meaningful and funny inscriptions. Some companies mint business cards and logos in this way, which is essentially nothing more than advertising. Modern coinage does not require large expenses for organizing such a mobile business, but requires only the correct organization and approach.
Features of copper coinage
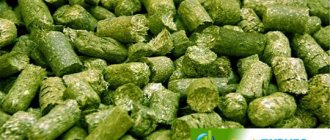
Copper sheets are an ideal material for making artistic embossing.
The material stretches well, the image is three-dimensional. Before applying the design, the copper sheet must be heated to red color to improve elasticity. Embossing on copper, as well as on other metal or foil, begins with transferring the sketch. To do this you will need carbon paper and a scriber. At the next stage, it is recommended to create a fatty surface. This will help the tool slide. For the operation you will need plasticine.
Copper coining begins with processing the blank from the front side with contour lines. The purl contour is extended after applying additional lines using the appropriate embossing operation.
Next, they begin to stretch and adjust the main volume, stretching it out or lowering it. The final look of the coinage can be given by tinting, patination or oxidation. These operations will change the color of the copper coinage, using special chemical compounds.
Operations should be carried out in a fume hood or in a well-ventilated area, and storage containers should be closed with ground stoppers. Before applying the decorating layer and after the operation, the embossing is washed, degreased and dried.
In the latter case, sawdust is used, which easily absorbs moisture.
You can find ways to change the color of copper coinage on the Internet and use the recommendations, or you can come up with your own original method.
We invite you to watch a video on minting on a copper sheet:
Ripple
The Ripple platform is based on trust. The platform registry (XRP Ledger) is a “credit network”. It is designed to issue “credits” for tokens created on its platform.
Your own cryptocurrency is needed for services, goods, and more. “Credits” are electronic promissory notes. The issuer guarantees to pay the token holder the agreed upon value.
With Ripple, you won't be able to give away crypto coins right away. A user who issues his own currency must create a “trustline”. When forming the latter, the recipient must indicate the issuer’s wallet address in the settings of his wallet.
Main types of coinage
There are several types of coinage - three-dimensional and flat. Volumetric is distinguished by a high relief shape. Flat, on the contrary, has a low relief. Each of these types has a number of advantages. Undoubtedly, three-dimensional relief looks more impressive; in fact, these are 3D technologies implemented in metal, for example, pipe embossing can be classified as three-dimensional. On the other hand, flat metal chasing is more openwork in nature and this can be considered a sign of a high artistic style.
Volumetric metal minting is a much more complex technological process. Moreover, processing the part using such methods can lead to deformation of the base metal.
Meanwhile, three-dimensional artistic metal chasing is considered to be a product of high artistic value.
By the way, archaeologists still find products of relief artistic chasing on metal, made of thin sheets of gold and silver. Ancient craftsmen mastered the methods of casting these metals, but preferred to use more subtle methods of making jewelry.
DIY metal embossing for children – Metalworker's Guide
Metal embossing is a technological process used for the production of relief images, inscriptions, and various souvenirs. It is one of the types of fine arts and crafts. Each handmade product is exclusive.
Craft or art
The artistic processing of metal by embossing has been known since ancient times. The masters of the Middle Ages perfectly mastered the art of “punching out” images on a thin sheet of soft metal, and their ability to create drawings using a hammer and a special striker, called “chasing,” was passed on from generation to generation.
Currently, relief artistic images, as before, are made by hand, so each work is unique and inimitable. The material used is different, but it must be plastic and stretchable. The best sheet metals for embossing are brass, aluminum and copper.
Specifications
Metal embossing is done on a so-called substrate, which is placed under the workpiece. The substrate should be pliable and not absorb shock under hammer blows. Craftsmen usually use a cross-section of hardwood - this could be a birch log, an oak butt, or a linden ridge.
For embossing on particularly thin metal sheets, felt, a thick rubber plate or a thick tarpaulin bag filled with river sand is used. The latter method is used if the area of the source material is more than half a square meter.
For smaller items, professional embossers prefer a lead plate, which allows them to achieve the finest strokes and lines in the image.
Kinds
Embossing (photos presented in the article) comes in two versions: volumetric, with a fairly high relief, and flat, in which the relief indicators are insignificant. Each type has its own advantages.
The relief image is more impressive from the point of view of story aesthetics, since there is a convergence with the 3D format, and this is considered a positive factor.
But flat metal chasing can be done in an openwork version, which is an indisputable sign of artistic style.
Notching
Lace patterns in metal require high skill and are made using the through-punching method. The workpiece is cut in two stages. First, the contours and lines along which the pattern will be punched are outlined with sharply sharpened stamps, then the material is directly punched through.
After the product has been cleaned and deburred, firing is carried out to level the material
This technological operation requires special care, since the thin openwork partitions can melt
A subtype of flat coinage is the contour method, which resembles engraving with low relief. Contour embossing can be convex or concave, depending on the subject of the design. As a rule, such items are used to decorate interiors, but they are also interesting as independent decorative items.
Relief embossing
Volumetric products are more complex from a technological point of view and, in addition, carry a constant threat of deformation. Nevertheless, relief embossing on metal is considered the most aesthetic and artistic.
During excavations in the southern European regions, archaeologists have more than once found the finest items of gold and silver, made using the method of relief chasing.
And although the ancient craftsmen mastered casting technologies, they preferred more elegant ways of creating jewelry.
Do-it-yourself metal chasing
To begin with, you can try embossing on kitchen utensils. This could be a coffee or tea can. How to make embossing at home? It’s better to start with a concave variety, that is, the pattern will be directed inward. To do this, you need to firmly secure the material, in this case a metal coffee can, and outline the design with a pencil. The topic can be anything.
Then you need to make a tool for chasing. At home, a regular construction nail 100-150 millimeters long is suitable for work, the sharp end of which should be ground off. When the tip of the nail takes on a rounded shape, it can already be called a canfarnik - this is the main tool of the chaser.
All that remains is to find a hammer weighing two hundred grams, and you can get to work. Using light blows, you need to apply the contours of the design, and then knock out the dots. Do-it-yourself metal chasing at home is a creative process that can be the start of a long-term hobby.
Gold
The appearance of the first gold coins in Rus' occurred at approximately the same time as those made from silver, but their volumes were incomparable, and the rulers who came to power after the 10th century completely stopped “gold” coin production. Under Peter I, gold coins finally took a strong place in circulation; these were 2 rubles and the so-called chervonets, on which their denomination was not indicated. Under the reign of Elizabeth Petrovna, new denominations of 5 and 10 rubles appeared. During a period when paper banknotes were catastrophically depreciating, gold money, which remained a solid and reliable monetary instrument, was in great demand and had a high exchange rate.
The last circulating circulation took place in 1923, these were chervonets, identical to the royal 10 rubles. But 10-ruble coins made of precious metal, minted to provide paper chervonets, did not reach the population. And they refused to accept them abroad because of the Soviet symbols depicted on them. For this reason, production was stopped, and the minted edition was melted down. Subsequently, coins from this precious metal were issued only for investment purposes and were not intended for regular circulation.
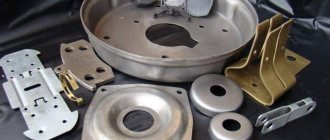
Craft ideas
You can make various accessories and decorative items from coins; the choice of crafts is extremely wide.
- Photo frame;
- Souvenirs with a monetary message;
- Floating cup;
- Panels and flower pots;
- Hot pads;
- Topinary;
This is just a small part of what can be made from the most ordinary coins. Various photos of crafts made from coins will help you choose the right option and start making it.
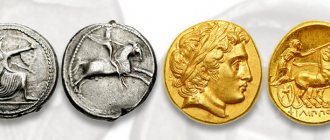
First minted coins
No machines were used to make the very first metal money; each coin disk passed through the hands of a master who put his skills, knowledge and soul into making money. Among ancient coins it is impossible to find two identical copies; each of them was one-piece. This continued for several centuries until man came up with a reducing machine. Rollers, balancers or hammer shells began to be used to produce coins. The diversity of approaches to the minting process has left numismatists with a wealth of material for research and collection of collection specimens.
Photo frame
Required materials: coins of different sizes, cardboard, glue, possibly putty, plasticine, modeling dough, paint, varnish.
Work progress: Cut out a hole of the required size from cardboard. We cover the frame with coins according to our own imagination. To make it easier to change photos, it is fashionable to attach special photo holders to the back.
15th century coinage
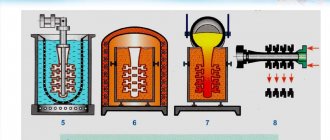
During this period, large-sized thaler coins appeared, which were already difficult and simply impossible to mint using a stamp pair and a hammer. The minting technique required urgent improvement, in particular in terms of increasing the impact force, which could leave a clear imprint on a large area of workpiece. It is possible to increase the penetrating force with the help of a falver. The principle of increasing the power of the device was based on the high height from which the penetrating projectile fell. The higher it was raised, the more powerful it was minted. The technology can be schematically described as follows:
- The lower stamp was fixedly fixed on the carriage of the machine.
- The upper half of the stamp pair was installed on the end of the log.
- The log was raised to the required height with the help of several people or using horsepower.
- After it was released, it fell vertically and minted a coin disc.
The height of the striking rod, and therefore the impact force, were not always equal, which is why it was not always possible to mint a coin the first time. If the result of the impact was not satisfactory, the process was repeated until a clear relief profile appeared on the metal workpiece.
But even before the introduction of falwerks into the production process, a colossal step forward was made in the coin business. The mintmasters (persons primarily responsible for the production process of the mint) came up with the idea of making a reusable sample of a coin stamp, which made it possible to stamp completely identical coins. For this work, engravers were invited to carve the desired image on the ends of a metal rod. The production of identical money began, although the speed of its circulation was very low.
Letters or numbers
Required materials: coins, glue, base (cardboard, plywood, foam).
Work progress: cut out letters or numbers from the existing base. Cover the base with coins.
This extremely simple decor can be used to decorate a photo zone at any photo shoot, any holiday or event.
How to clean copper-nickel coins?
Let's consider the main available methods for cleaning copper-nickel coins of the USSR and their features. It is highly recommended that you start testing them on the least valuable specimens, which you won’t be too sorry for if they fail.
Electrolysis
The essence of the technique is to place the metal in a weak (isotonic) salt solution, into which a small electric current is applied. However, this is still far from a harmless and unsafe method for humans, since you have to deal with liquid and electricity at the same time. Hand and eye protection must be provided. For cleaning, a 12-volt power supply is used, which requires preliminary preparation. You need to cut off the plugs and divide the wires into 2 parts, stripping their ends of the insulating material. After this, you need to twist the copper wires and solder them to the metal clamps, which should not touch!
Now you need to make an electrolyte. The solution is made at the rate of 1 tbsp. l. table salt per 0.5 liters of water. It needs to be poured into a plastic container.
After turning on the power supply, both clamps are immersed in water with all necessary precautions. The one that begins to hiss in the electrolyte is positive (the “+” sign), you need to attach a coin to it
The negative end of the power supply must be connected to another metal object, such as a regular spoon. In this position, the entire switched-on structure can be left for a long time, up to 4 hours. The approximate time is calculated depending on the condition of the coin and how dirty it is. After this, the current is turned off, the coin disc is removed from the liquid and washed in a warm soapy solution, and then wiped dry with a soft, clean cloth.
"Tilon-B"
This is an effective product that can dissolve patina, but it is very important to do it right. For 1 part of Trilon-B you need to take 10 parts of water.
You don’t need to make a lot of solution, just enough volume to immerse a coin in it. After immersion, you need to stand nearby and monitor the cleansing process. The duration of the procedure depends on its condition. After this, the coin should be washed with soapy water, easily and without pressure, cleaning it with a soft brush. Rinse and wipe dry.
Cigarette ash
The method is more likely to be a folk, non-standard one, but sometimes it turns out to be very effective. You will need ashes from smoked cigarettes and plain water. The contaminated coin is first moistened with water, after which ash is applied to it. She remains there for about 20 minutes. After this, you need to gently and carefully rub the ashes into the metal, and then rinse with warm water and wipe dry.
Ayran
The well-known fermented milk drink can also help in cleaning coins made of copper-nickel alloy. But this process will not be quick and gradual. The coin is placed in the ayran for 3-5 days, after which it is removed, rubbed with fingers and placed in a new composition. Each time the result obtained is evaluated to understand how many cycles need to be applied to achieve the desired effect. This is one of the methods, the advantage of which is that there is no reddening of the copper surface.
Cleaning with soda
Let us immediately make a reservation that for coins that, due to storage conditions (for example, buried in the ground) have a frankly bad appearance, this method is unlikely to be effective. You will need: baking soda (carbonate), foil, enamel bowl and boiling water.
Soda is poured onto the foil in an even layer of approximately 2-3 mm, and a coin (or several) is placed on it. The same layer of soda is poured on top. Now you need to fill everything with a small amount of boiling (not boiling water a minute ago, but boiling) water. The container is closed with a lid and left for 0.5 days. Depending on the neglect of the coin and the result obtained, you can repeat the cleaning several times. After that, everything is as usual - we take it out, wash it with soap (it’s a good idea to use toothpaste instead of soap), dry it or wipe it dry.
You should be prepared for the fact that in places where the surface is damaged it will not be shiny silver, but darker and more matte.
Making a vase
This craft will be a great way to decorate a cracked or damaged vase. Making such a craft is extremely simple; all you need to prepare is an old vase, coins and glue. The vase is simply covered with coins; it is important to remember that the color of the vase should be a single color; for gold and silver coins it is best to use a black background.
You can decorate a bottle in the same way; the finished product can also be painted gold or silver with spray paint.
The vase is extremely simple to make; you can take a vase of any size, as well as bottles or glasses. This idea will tell you how to make a coin craft as simply and quickly as possible.
How to store coins after cleaning?
To ensure that coins remain free of oxidation and do not require frequent cleaning, they must be stored properly. They should be in a dry place, protected from direct sunlight. There are several storage methods that collectors usually use:
- Special albums with plastic pockets containing coins.
- Cardboard tablets with round slots for coins.
- Glass pencil cases. In such a pencil case you can not only store, but also view valuable coins without taking them out.
Frequently touching coins exposes them to bad influences, so you need to grab them by the edge. If you still had to take them outside the field, you should immediately rinse them with warm water and dry them.
By following all the rules for cleaning and storing copper coins, you can be sure that the most valuable pieces of your collection will delight you with their appearance for a long time. Do not forget that copper is not a very hard metal and must be handled with care.
https://youtube.com/watch?v=sjRRzRWatT8
Tip 2
If there are no decorative leaves, then you can take fabric and cut them out of it, after which the resulting leaves must be painted with green paint.
You can glue some beautiful shiny rhinestone between the leaves. The resulting apple should be placed on a plate and decorated with various accessories that you have at home.
Materials used
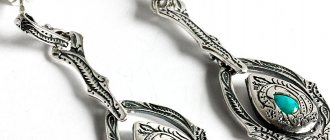
Embossed jewelry is traditionally made from silver and gold. Most craftsmen work with cheaper metals:
Copper with a thickness of 0.3 to 1.5 mm. It is plastic, easy to process, depending on the brand with a light or dark shade of red. Copper and its alloys are more often used than other metals for decorating rooms. Red copper, sheets of which can be rolled to a thickness of 0.05 mm. Due to its softness, relief embossing can be easily performed even on voluminous products of complex shape. High resistance to corrosion allows the installation of decorative elements made of hammered copper on the facades of houses. Various brands of brass with golden yellow color in different shades. High (up to 50%) zinc content increases hardness and reduces flexibility. However, despite its lower ductility than copper, brass is easily minted. Tompak is a type of brass with a low (up to 10%) zinc content. Due to the large proportion of copper, the metal turns out to be red in color with a yellow tint. The alloy with the addition of aluminum up to 5% acquires a color indistinguishable from the color of gold. Tombac is used to make badges, medals for anniversaries, cheap jewelry, and decorative elements for interiors. Aluminum and its alloys
The metal is easily minted, but due to its low melting point, care must be taken during heat treatment to ensure that the design does not become deformed. Duralumin imitates silver well, but it is difficult to work with, since due to its low flexibility, the metal may crack when knocking out the relief. Tin plate on which beginners practice their embossing skills
However, masters also do not neglect this accessible material. Ferrous low-carbon metals. The blanks are pre-annealed and etched to obtain a decoper, on which images with large relief or designs with small details are minted. Roofing iron for embossing contour images with shallow relief without background and small details. Stainless steel with a thickness of 0.5 to 0.8 mm. The metal looks beautiful, but due to its high strength and dense structure it is difficult to knock out. High resistance to corrosion allows us to make embossed memorial plaques and plaques for monuments and monuments from stainless steel. Cupronickel and nickel silver are nickel alloys with a high copper content (81 and 65%, respectively), so they are ductile and easy to polish. Chemical treatment makes the surface golden, silver, or imitates antique bronze.
There should be no dents, scratches, stains or delaminations on the metal for minting. If the embossing is carried out on a resin base, bitumen No. 4 or 5 will be required, and kerosene or machine oil will be required to remove it. As an alternative, I use plasticine, birch or linden logs, felt or rubber mats, and lead plates. Grinding and polishing is done with quartz sand and powdered pumice. Chemical treatment is carried out:
- hydrochloric, sulfuric, nitric acids;
- potash;
- copper sulfate.
GOI paste
The method significantly damages the surface of the products, like any cleaning with abrasives. If the coins are rare and are being cleaned for sale, cleaning with GOI paste is excluded: polishing removes a thin layer of the surface, erases small details and the products lose their value.
GOI paste is usually applied to a soft rag, sometimes moistened with gasoline. Before you start polishing, you need to wipe a layer of paste on an unnecessary surface or object so that large pieces disperse and do not scratch the part.
In general, there are plenty of ways to clean nickel coins at home. Depending on the degree of contamination, you can choose the appropriate one.
Historical reference
More than a millennium has passed since the appearance of the first Russian metal coins, and throughout this time the metal of the main money supply was silver. Gold and copper occupied a significant place and importance in it, and yet silver in all centuries was unrivaled until the advent of Soviet power
The word “money” itself has Turkic roots, and in the pre-Mongol period in Rus' the equivalent word “silver” was in circulation, which clearly shows the importance of this metal in popular monetary circulation
The first copper in this capacity appeared in troubled times of feudal fragmentation against the background of the poverty of the treasury of individual subjects. And already under Ivan the Terrible, golden money discs saw the light of day. However, both of them had very limited circulation. And only under Peter the Great both copper and gold found their strong place in monetary circulation in Rus' and in international payments. But each metal deserves special attention.
Traditional recipes for cleaning silver
When the contamination is minor, folk remedies for cleaning silver objects are effective. These methods include:
- Potato. Place the peeled potatoes and coins in a container and leave for 3 hours.
- Coca Cola. The coins are poured into the drink and infused for 2-3 hours. If necessary, the process is repeated until complete cleaning.
Water after boiling eggs
It is believed that the boiling water left after boiling chicken eggs can clean silver. To do this, coins are dipped into the liquid for 1-2 hours. After soaking, they need to be thoroughly rubbed, removing all soaked plaque.
5% formic acid solution
Formic acid removes oxide well. Coins are dipped into the 5% mixture for 10-15 minutes. Afterwards the product is taken out and wiped well with a cloth.
Formic acid
Olive oil
A cotton pad is moistened with olive oil and the product is rubbed. This product does not remove oxidation well, but helps impart a metallic shine to the surface.