How to use a blowtorch?
The devices are a fire hazard, so strict precautions must be taken. You can understand how to set up a blowtorch by following the algorithm of actions:
- Fill the tank with fuel no more than 3/4 of the tank volume.
- Obtain pressure after 6–10 smooth manual pressures.
- Pour fuel into the bath: gasoline or ethyl alcohol, which does not leave soot when burned.
- Light the fuel to initially preheat the evaporator.
- Open the shut-off needle after combustion and adjust the flame size.
- Stop the blowtorch by extinguishing it. To do this you need to close the needle.
- Cool the device, then open the reservoir to release the pressure.
Nuances and operating instructions
A propane burner is a dangerous device, and therefore, when working with it, you must follow the operating and fire safety rules
Roofing propane burner, instructions for use:
Carefully and tightly screw the nozzle onto the nozzle. Connect a hose to the cutter fitting, securing it with a special clamp.
They are usually not included in the kit and will need to be purchased separately. Attach the second end of the hose to the gas vessel. Check the tightness and reliability of the connections with the flame regulator closed. Using soapy water, check the tightness of the connection and gas-air leaks, and with the gas valve on the cylinder open. Smoothly turn the gas regulator counterclockwise and light the burner.
It is prohibited to point the torch at flammable materials. After completing the work, close your gas valve on the vessel. When the burner flame goes out, close the torch torch regulator and allow it to cool.
Dangerous and harmful production factors when working on the roof with a propane torch:
- The occurrence of a fire hazard;
- explosion of a gas container;
- burns from open fire;
- thermal burn from heated cutter surfaces.
Blowtorch. Scope of application and operating principle
The blowtorch is a relatively old invention; few people know that in 2031 everyone will be able to celebrate the 150th anniversary of the creation of this useful device by Karl Rickard. It must be said that over the past time, the design of the device has not changed and, despite the emergence of new, modern tools, such as an industrial hair dryer, the relevance of the blowtorch remains, and in some cases it is completely impossible to do without it.
Where is the lamp used?
- Various types of soldering up to high-temperature hard solders, since the flame temperature is quite high up to 1100 oC.
- For low-melting materials, even welding is possible.
- Removing old paint from window frames by heating it and scraping it off. The pleasure is unpleasant due to the pungent odor emitted by the burning paintwork, but it is effective.
- In repair work, to dismantle rusted metal structures or unscrew a jammed bolt.
- In nature, it can be used for cooking using a simple device in the form of a pipe bent at 90 degrees and placed on a burner.
- For tarring pork carcasses
- Other (depending on your imagination).
The lamp can be refilled with various flammable mixtures of liquid or light hydrocarbons, or substances that are organic compounds, mixtures of gases: alcohols, kerosene, gasoline, natural gas, etc. Gasoline blowtorches are most often used and lamps fueled by natural gas are becoming increasingly popular; they are also structurally designed completely differently than the classic design.
The dimensions of the devices may vary depending on the size of the tank into which the fuel is filled. The maximum volume of the tank can be up to 2 liters, however, taking into account that a “filled to capacity” lamp will not work (you need to leave room for air injection and vapor formation), this value is adjusted to 1.8 liters.
Use only high-quality blowtorch fuel. For example, special gasoline or gasoline with an octane number of at least 80. Low-quality fuel can create an explosive situation, lead to clogging of the injector and premature failure of the device.
Design features of a gasoline lamp
The lamp consists of two parts: a fuel tank and an ejector at the outlet of which the air-fuel mixture is burned. Gasoline is poured into the lamp through a special round hole in the tank, which is then hermetically sealed with a plug. Tightness is ensured by a rubber seal.
Using a built-in pump, excess pressure is created in the tank - this is necessary in order to ensure the flow of gasoline vapor into the ejector. Using the valve, the lamp power and flame size are adjusted. For kerosene or alcohol soldering lamps, an evaporator is added to the design.
To start the lamp, a saucer is provided under the ejector burner. Gasoline is poured into it, which is then set on fire. The engulfed flame heats the ejector. Gasoline vapors are formed inside the device, which, thanks to excess pressure created in advance using the pump, are forced into the ejector and, passing through the nozzle, ignite to form a torch. The combustion of vapors is maintained by air suction into the combustion area.
During the heating process of the lamp, air is not pumped into the tank using a pump for safety reasons, and the control roller is in the “off” position. The regulator roller opens only after the burner and evaporator have reached sufficient temperature.
My homemade gasoline burner
Hello, friends. So I got the idea to review my homemade gasoline burner for melting precious metals and copper alloys. I would like to note that this project did not incur any special financial expenses, all you need is desire, inspiration and three free evenings after work. Let me start with the fact that its device is not very complicated, it runs on a gasoline-air mixture and is connected to a 220 V network.
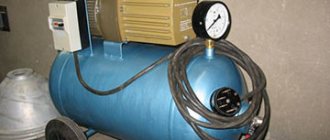
Consists of an old but working refrigerator compressor
A regular switch and start relay (from the same refrigerator). When disassembling the refrigerator, I sketched out the connection diagram, where which wire goes, etc., which made the installation much easier for me, since I am not an electrician.
The compressor outlet tube is connected by a flexible tube to the container where the gasoline-air mixture is prepared
The design of this container is simple: gasoline is poured into the container 1/3 full, the air supply tube is located below the level of the surface of the gasoline and, when turned on, begins to gurgle, as a result of which the air is enriched with gasoline vapor and is supplied to the burner itself through the outlet tube in the lid of the container. I made the container itself from an old diesel fuel filter, welding a kerosene stove tank to it at the bottom.
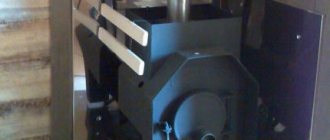
Here's the burner itself:
I made it from a used CO2 canister.
Inside there is a brass plate with holes. in the middle of which is the main fuel jet (copper tube)
Tap for adjusting the amount of mixture supplied to the nozzle. The faucet is an ordinary water tap, I removed it from the old batteries when I changed them, it was intended to bleed air from the heating system.
I didn’t bother too much with the handle, I just wrapped it in insulated tape.
The whole thing was soldered with ordinary solder, I only welded the head itself with the nozzle (although it was also possible to solder it, the temperature when working there is low). Connected to the container with a regular dropper tube.
I use an ordinary red brick as a container for melting, cut off the required piece from it with a grinder and use a grindstone to create a small cavity in the middle so that the molten metal does not leak out.
Additional tools needed: crooked pliers, an old file and a lighter.
And also a special powder, similar to angel dust, without which all the work will go to waste
You also need to think about safety precautions: Work outside or in a clean, well-ventilated, fireproof room, a metal screen and a fireproof base (brick) that can be safely heated (burner flame temperature is about 1500 degrees). And you can work. Yesterday I worked with silver for the first time, it melts perfectly, this is the ring I came up with
Here I want to show how the device itself works. I melt brass rods.
Handling old lamps
Old blowtorches that have not been used for a long time should first be inspected from the outside. During inspection, you need to check how easily all the valves and the tank lid open. The adjustment valve should turn easily. After this, you need to check the housing for leaks. To do this, use a pump to pump air into a lamp that is not filled with fuel. Then, using a brush, apply a thick soap solution to all threaded connections and the faucet. You need to check it closed and open.
If all connections are tight and the pump is properly creating pressure in the housing, the tap performs its functions by opening and closing the burner, the lamp can be refilled and started.
Furnaces and boilers running on waste oil have long taken their rightful place among heating appliances. Exhaust is a cheap and sometimes free type of fuel; it is often used for this purpose in car repair shops and garages. Many craftsmen, when choosing a design, ask the question: is it possible to convert a gasoline blowtorch into a burner for mining?
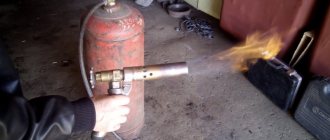
Is it possible to make a blowtorch work during mining?
The principle of operation of a conventional blowtorch is to ignite gasoline vapors, which are pushed out under the action of compressed air. This effect is achieved by forcing air into the burner fuel tank.
What happens if you pour used oil into a blowtorch?
Oil itself, even under pressure, does not evaporate well - it needs to be heated. Due to poor atomization, the flame will be uneven and it will be difficult to ignite the burner. The oil burns with the formation of a large amount of soot and soot, so the jet will quickly coke, its cross-section will decrease, and the lamp will fail. Increasing the cross-section of the nozzle will also not give the expected effect - the oil will be sprayed in large drops, which will not allow obtaining a uniform flame of the torch.
In addition, used oil often contains impurities: diesel fuel, gasoline, antifreeze and even water, which can lead to flashes inside the lamp. To use waste as fuel for a blowtorch, you will have to install a filtration system, which will further complicate the task.
Considering all the difficulties, using a gasoline blowtorch as a burner during mining is difficult and unsafe. Therefore, it is necessary to modify or completely change its design.
Handling old lamps
Old blowtorches that have not been used for a long time should first be inspected from the outside. During inspection, you need to check how easily all the valves and the tank lid open. The adjustment valve should turn easily.
After this, you need to check the housing for leaks. To do this, use a pump to pump air into a lamp that is not filled with fuel. Then, using a brush, apply a thick soap solution to all threaded connections and the faucet. You need to check it closed and open.
If all connections are tight and the pump is properly creating pressure in the housing, the tap performs its functions by opening and closing the burner, the lamp can be refilled and started.
A blowtorch, as a device for performing a variety of repair and construction work, is still in wide demand. Their popularity is due to their compactness, ease of use, and, subject to proper operation, also safety. We will discuss below how to work with the lamp correctly and maintain it on time.
Gas burner: what is it and why is it needed?
Do-it-yourself vacuum cleaner: step-by-step instructions on how to make a simple and effective regular and washing vacuum cleaner (90 photos and videos)
This is a device that prepares a mixture of flammable gases, allowing the formation of a stable torch that can be used to perform various types of work. The design of the burner and the type of fuel used allows you to control the intensity of the combustion process within wider limits than is possible when working with a blowtorch. The gas burner does not have a reservoir with a flammable mixture, which can explode if used incorrectly. The operating principle is simpler. The areas of application are wider, here are five main ones:
- For lighting. Despite the widespread use of electricity for these purposes, the need for gas lighting lamps has not completely disappeared. Now they produce many special models that give light to lovers of nighttime outdoor recreation.
- Gas burners for boilers of heating systems.
- For heating large volumes of air. For example, premises in the cold season or supplying a heated mixture of volatile gas into the balloon shell.
- For welding, soldering, surfacing and cutting of metals with a high melting point (more than 1100 °C).
- Gas burners for household and commercial purposes. They are used both for cooking and in construction, repair or maintenance of equipment.
The wide range of applications of gas burners involves many design varieties, which differ:
- According to the method of mixing gas and oxidizer
- Type of fuel mixture supply.
- Type of fuel used.
Manufacturing Features
The design features are that it is very easy to operate; there are no traces of soot or repulsive odors when using the gas burner. This device is compact and can be used virtually anywhere. The main component of the burner is the industrial valve. You can purchase a new part, however, and used ones that are in working order are quite suitable. The process of making a burner with your own hands begins with the handle, then the body and nozzle are made.
In order to obtain a burner that is safe to operate and does not waste fuel, you need to make it a rule to avoid scaling and adjusting the example circuits.
To be fair, it is worth noting that not all gas appliances are calculated according to the laws of gas dynamics. But if the manufacturer changes the dimensions of the design parts, then the Reynolds number of the fuel (or intake air) will go beyond the limits indicated in the original product. The burner with such “improvisation”, if we give an optimistic forecast, will begin to smoke and will be “gluttonous”, or even be completely dangerous in operation.
And one more important note regarding the manufacturing features of the burners: it is impossible to increase its power above 10 kW. And that's why. With a burner efficiency of 95% (which is an excellent indicator for an amateur invention), with a device power of 1 kW, it will take 50 W to self-heat
It is theoretically possible to get burned on the structure, but it is not fraught with explosion. But if you build a burner with a capacity of 20 kW, 1 kW will be superfluous. Threshold manifestation is expressed by the structure being hot or bursting into flames. Therefore, those burner drawings that are oriented at 7-8 kW should not be considered
With a burner efficiency of 95% (which is an excellent indicator for an amateur invention), with a device power of 1 kW, it will take 50 W to self-heat. It is theoretically possible to get burned on the structure, but it is not fraught with explosion. But if you build a burner with a capacity of 20 kW, 1 kW will be superfluous. Threshold manifestation is expressed by the structure being hot or bursting into flames. Therefore, those burner drawings that are oriented at 7-8 kW should not be considered.
Recommendations
The principle of operation of the device is what you should understand before making the device. You can consider it using the example of a burner for roofing work. How does the burner work?
- The device is connected to the reducers of oxygen and propane cylinders by a system of supply hoses.
- Reducers are placed on the cylinders to create working welding pressure.
- A diagram for gas and oxygen is assembled, the tightness of the connections is checked, the nodes are secured, after which the gas can be opened with valves.
- The gas pressure is set to the operating value and the valve opens.
- The fuel is supplied through hoses to the propane appliance.
- The injector carries out the mixing process to form a gas-air environment.
- A working flame with a temperature reading above 2000 degrees comes out of the device.
READ MORE: Top 16 best heating radiators - 2020 rating Making a burner is one thing, using it correctly is another. A simple burner can cause an explosion or fire.
When performing any welding work, you must wear personal protective equipment: gloves and goggles, special shoes. You can work with propane cylinders only in a well-ventilated area, and at sub-zero temperatures, any actions with the burner are excluded.
What you should absolutely not do:
- work near open fire;
- keep the cylinder tilted;
- place vessels under the sun;
- carry out work without a gearbox;
- Warm up the gearbox over an open fire.
If you can clearly smell the gas, work with the burner should be stopped by closing the valve on the cylinder. Homemade burners, depending on the purpose of use, can be different: burners with a VK-74 valve, devices converted from an acetylene gas cutter and mini gas burners. It is realistic, profitable, and useful to build every homemade device. Only initially you need to decide on the type of structure and its parameters. The gas burner is also used in private households and for commercial purposes. In plumbing, a metal workpiece is heated with a torch, which ultimately comes out quite hardened.
How to make a gas burner, see below.
DIY gas burner from a blowtorch
A gas burner is a special device that ensures uniform combustion of gas and allows you to regulate the fuel supply.
Often, not every person can afford such a device, but a do-it-yourself gas burner, made from scrap materials, will be an economical and practical alternative to factory-made analogues.
Homemade gas burners
The main components in the manufacture of powerful gas burners are industrial valves.
They may be new, but for a homemade device it is enough to use used ones if there is no gas leak.
They are designed to work in tandem with a 50-liter propane gas cylinder, which has an angle valve and a reducer.
Burner with valve VK-74
The structure of this burner is shown in Fig. 1. The oxygen cylinder valve VK-74 is taken as the basis.
A fitting-handle turned on a lathe is installed at the outlet end, to the corrugated part of which the hose from the cylinder is connected.
A cap with a prepared hole with a thread for the nozzle is screwed onto the part of the valve with a conical thread K3/4˝, with which it was connected to the gas cylinder. You can use a ready-made blowtorch or gas stove.
The nozzle is made from a piece of 1/4˝ steel pipe 100 mm long and welded to the cap on two pieces of ∅5 mm wire.
A distance of 15 mm should be left between the cap and the nozzle to allow air to enter the combustion zone.
The position of the nozzle is adjusted by bending the wire holders to achieve a central flame position.
Sequence of actions to ignite the burner:
- Open the cylinder valve;
- Place a lit match near the nozzle and slowly open the burner valve;
- Control gas ignition;
- Adjust the flame using the burner valve
By the way! The highest flame temperature is at the end of the green-blue part of the torch.
A homemade gas burner of this design has one drawback associated with the location of the valve.
The gas flow is directed in the opposite direction to the normal position. The stuffing box seals experience constant gas pressure (incl.
when the valve is closed), therefore it is necessary to constantly monitor the tightness of the seals.
Attention ! Valve VK-74 should be used only when adjusting the flame. Stop the gas supply only at the cylinder
Burner converted from acetylene gas cutter
If you have an acetylene torch with a faulty oxygen supply valve, do not rush to throw it away.
It is also suitable for making a burner (Fig. 2).
The mixing chamber requires modifications, the contents of which must be removed to reduce weight.
The oxygen barrel and valve will need to be removed. Solder the resulting hole with hard solder. Connect the hose coming from the gas cylinder reducer to a fitting with a left-hand thread M16 × 1.5.
We recommend! Do-it-yourself resistance welding from a microwave
Using a union nut, secure a homemade tip bent at 45° to the mixing chamber to make it more convenient to work with the burner. Screw a flange with a nozzle welded to it onto the thread of the tip.
One of the options for such a burner is to use a cap with an M22 × 1.5 thread. The design of the nozzle here is similar to the nozzle of the burner described above. The homemade gas burner is ready for use.
Gas mini burner
Mini gas burners are more suitable for working with small parts. The mini burner is based on a needle for inflating balls.
It is necessary to make a cut in it, a little further than the middle of the needle. Some needles already have a similar hole, which significantly speeds up the work process.
Next, you need to take the syringe needle and bend it about 45 degrees in the middle.
Mini gas burner design
It is best to sharpen the pointed end of a syringe needle so that it is straight. After this, it needs to be inserted into the ball needle so that one end comes out through the hole, and the other protrudes from the large needle by several mm.
The resulting mini structure should be fixed using soldering. After this, droppers must be attached to the bases of the two needles.
Clamps - dropper regulators need to be moved as close to the needles as possible.
In the resulting burner they will act as gas and air supply regulators.
All that remains is to connect a source of compressed gas to the finished device, the burner is ready for use.
This homemade gas burner can heat objects up to 1000 degrees.
You should work with it carefully, observing safety precautions.
Infrared heater
Using homemade gas burners may give you the idea of creating your own infrared heater. Such heaters are designed to heat houses or garages in the face of ever-increasing gas prices.
The easiest way to retain heat is to use ordinary food foil. It must be mounted on the wall behind the battery.
Heat flows will be reflected from the aluminum surface into the room, which will not allow heat to escape through the walls.
We recommend! How to make welding electrodes with your own hands
In a more complex version, you can use a spiral. To do this, you need to purchase an incandescent coil and an infrared port in the store.
Making such a device is quite simple: the spiral needs to be placed in a metal block, which is connected to the electrical network. An infrared port is attached to the resulting structure.
This device works based on the ability of the port to distribute thermal information received from the hot coil into the room.
For garages or other small non-residential premises, a heater made from a small tin box and graphite sand is best suited.
Top 10 best gas torches for soldering
Welcome everyone to the blog! Today I will give you my Top 10 best gas torches for soldering and welding small parts.
It is necessary to understand why people came up with gas soldering in the first place and where it is advisable to use it.
Let me give you a simple example: an electrician is installing wiring in a new house and wants to solder copper wires in the junction box for a reliable connection.
It is clear that there is no wiring yet and there is nowhere to stick the soldering iron. This is where a gas burner or gas soldering iron comes to the rescue.
Soldering and gas welding are often used in jewelry - when a high melting point and an even seam of product parts are needed.
In amateur radio practice, gas burners are not very common, but there is nothing better than such a burner when soldering radiators, housings and other parts that require intense heating. And how nice it is to heat shrink with such a burner - it’s just brilliant. Well, enough of the lyrics - let's get on with the review.
1st place – mini gas burner with soldering attachment
Designed for both heating medium-sized parts and for contact soldering due to the heating of the tip from the flame. A kind of soldering iron without wires.
The gas tank capacity is 8ml. The flame temperature when filling with butane reaches 1300 degrees Celsius, and the tip temperature – 450 degrees. The flame length is adjustable from 4 to 6 cm.
The length of the burner is 13 cm and the diameter is 1.5 cm.
The price of such a burner is 400 rubles.
Advantages: small and inexpensive, enough refill to solder several medium-sized parts, has a nozzle for contact soldering, easy to refill.
Disadvantages: no piezo ignition.
2nd place – gas micro burner
There is nothing in it except a tank with a filling valve and a nozzle with a gas supply regulator.
The ZC57100 does not have piezo ignition and it is supplied unfilled, so you will also have to buy a gas cartridge - it will be suitable for lighters.
In general, to solder two wires or heat heat shrink without a soldering iron, such a torch is enough. The burner is also about 20 cm long and weighs 43 g.
This is the cheapest burner that can be found and the price of such a micro burner is 200 rubles.
Advantages: cheapest, easy to refill.
Disadvantages: small flame, refill runs out quickly, no piezo ignition.
3rd place – mini gas soldering iron KVT XZ-1
This remarkable soldering iron from the gas powered brand features piezo ignition and comes in a case with a set of 4 soldering tips, a spool of solder, and a tip cleaning sponge.
Thus, the declared power of the soldering iron for contact soldering is 137 W - this is a lot for a soldering iron with a length of 21 cm and a weight of 120 g. Electric soldering irons have never dreamed of such weight and size characteristics.
This soldering iron is not positioned as a torch, but it can be used as a torch - the flame is pencil-type.
Burner classification
The device of a gas burner is quite simple. Modern gas burners are divided as follows:
- Pre-mix. A gas mixture is formed immediately before entering the outlet.
- Injection burners. The air required for combustion is spontaneously sucked in (as they say, injected) by the gas jet itself.
- Regenerative. The essence of their work lies in the preheating of gas and air. This happens before mixing. The heating itself is carried out by a special device - a recuperator.
- Regenerative. Preheating in burners of this type is carried out in a regenerator.
- Pressurized (supercharged gas burners). In them, air is forced into the firebox by a special fan. This happens after mixing the combustible mixture.
- Diffusion. By design, these are the simplest burners. They consist of a regular tube with holes drilled in it. Gas is supplied through these holes. To ensure constant and reliable combustion, the necessary air comes from the environment.
- Gas atmospheric burners for boilers. The principle of their operation is very similar to the principle of injection burners. The main difference is that oxygen enrichment is not carried out completely, but partially.
- Gas burners for stoves, fireplaces, heating systems.
Homemade gas burner at work
The power of any gas burner is determined by the volume of gas consumed per unit of time. It can differ quite significantly for different burners.
Homemade gas burner from a blowtorch
A gas torch is a useful device; it can be useful for forges, soldering, and in many other cases.
This device can be bought, but a homemade gas burner works just as well, and it’s not that difficult to make.
It can be made quickly, the main thing is to follow all the rules so that the finished equipment is completely safe.
Of course, you will not be able to obtain the same power as industrial equipment, but for repairs and a number of small operations such a burner is quite suitable.
How to modify the burner?
To control the fuel flow, you need to install a control valve and a flame divider on the soldering device. The tap mechanism can be installed both on the device itself and on the tube coming from it. It is important to install it so that it is not difficult to use.
It is optimal to install it approximately 2-3 centimeters from the handle. The faucet can be removed from any suitable device or purchased a new one. It is most convenient to place it at the connection point of the tube, additionally sealing the connection to avoid leakage.
The divider can be made of brass. If you have a cylinder-shaped piece with a hole for the tube on one side and a smaller hole on the opposite side. Such a workpiece will require minimal processing and will work as efficiently as possible.
When installing the divider on the tube, make sure that its edges are a couple of millimeters in front of the edge of the nozzle. This position will not only protect the flame from being blown out by the wind, but will also ensure a stable flow of oxygen and maximum combustion power.
You can make a divider in a simpler way. To do this, you will need a brass tube of a slightly larger diameter than was used to make the burner itself.
In this case, parallel mounting should be used.
An area of low pressure will appear at the outlet of the nozzle, so air will be attracted to it and improve combustion.
Conclusion + video
A homemade gas burner is a simple device. It is similar to the primus used by tourists and at dachas. They differ only in size and type of fuel used.
There is no need to pressurize the device to an increased level - the cylinders already have sufficient pressure for high-quality work. It is best to prefer cylinders with propane or a mixture of butane and propane.
If you make it in accordance with all the recommendations given, the device will be reliable and will serve you for many years.
Do-it-yourself gas burners for soldering: instructions for making them using improvised materials
When repairing a car, sometimes you have to resort to soldering various metal parts.
The burner required for this is one of those tools that does not have to be purchased in a store - you can easily make it yourself.
Such skills can be very useful, because it is not always possible to go to a construction supermarket, and interruptions in finances are quite common.
Soldering allows you to make a permanent, hermetically sealed connection of two metal parts by a kind of “gluing” of them with some molten material - solder. The latter must exhibit high adhesion to the metals being joined, that is, be very “sticky”, and have sufficient strength after hardening.
The melting point of the solder must be higher than the operating temperature at which the soldered product is operated; and at the same time lower than the melting point of the base material.
A gas burner is precisely what is needed to heat the solder and thus make it sufficiently viscous.
Obviously, for ease of operation, its torch must maintain a stable shape and temperature.
The advantage of this tool is its ability to process areas with a large area - an electric soldering iron will not be able to handle such a task.
At the same time, you can make a simple, low-power burner with your own hands without much hassle.
With the help of a homemade burner you can do a lot of useful things. Its capabilities will be quite sufficient for soldering copper and brass vessels included in radiators, intercoolers and heat exchangers, as well as for soldering using hard solders.
In addition, only with the help of this tool can you disassemble the radiator in order to replace its core, as well as replace the honeycombs in it.
Mini horn
A small, portable forge is often useful on the farm. It can be used not only in the forge, but also in the garage or at the dacha.
To make a mini-forge with your own hands, you need to have 2 refractory bricks, a hacksaw, a drill with a diameter of 8 cm and a length of 15 cm. It is advisable to have a pobedite tip at the end. To fasten the structure, 2 pins with a diameter of 8 cm and a length of 21 cm are prepared. During the work, you will need 2 hole saws, 63 and 26 mm in diameter.
The operating procedure is as follows:
- 2 bricks, 250 mm long, are sawn in half.
- Two halves of one brick are laid on top of each other and 2 through holes with a diameter of 63 mm are drilled using a hole saw.
- Placing the third half under them, through holes for the studs are drilled in two corners, diagonally.
- Using pins, a block of three bricks is assembled and pulled together. First, washers are put on the ends of the studs and nuts are screwed on.
- A hole for the burner is drilled between the first two bricks using a 26 mm ring drill. It connects to the main passage, but does not touch the second wall.
The burner is inserted into this hole and ignited. Any metal is fed into the main passage, which falls under the flame and heats up in a few seconds.
The most common malfunctions and causes of failure
The most common malfunctions of a blowtorch are as follows:
- the pressure required for normal operation is absent or rapidly decreasing in the housing;
- there is no flame due to the fact that the fuel stream from the injector does not meet the required parameters;
- fuel leaks through joints and seals;
- Instead of spraying, a stream flows out of the nozzle.
Some problems can be fixed if you have the necessary tools at hand. Typically, repair work consists of cleaning individual components.
Sometimes the breakdown is so serious that it is impossible to repair the tool without the spare parts used for the blowtorch. Fortunately, you can find many repair kits in hardware stores and on specialized websites on the Internet.
The reason for the lack of pressure in the lamp may be a faulty pump. It can be replaced or repaired with your own hands. A rapid decrease in pressure occurs if the threaded connections, service and safety valves are leaking.
The problem is solved by replacing the gaskets, cleaning the surfaces of the covers and valves in contact with the body.
There is no burner flame if the fuel stream coming from the nozzle is very weak or intermittent. This can occur due to contaminants that have entered the lamp with low-quality fuel. In this case, it is necessary to clean all the channels and the jet with suitable tools and rinse the lamp with clean gasoline.
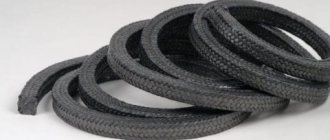
Fuel leaks through the seals of the control valve if the stuffing box, which is the sealing gasket between the body and the valve, has lost its properties. Repairing the malfunction involves disassembling the tap and replacing the stuffing box.
If fuel streams out of the burner, the reason is most likely that the nozzle opening is not correct. Before this, you need to make sure that the instrument is really warmed up. If problems of this kind recur during warm-up, the burner nozzle must be replaced.
Safety precautions for use
Remember about the explosion hazard of liquefied hydrocarbon gas, including propane-butane mixture and other gas mixtures used in gas equipment. Both during testing and during further use of the gas burner, follow the safety rules.
Do not use a gas burner at a distance closer than 10 meters from a gas cylinder, this violates safety rules and can lead to an explosion and fire
It doesn’t matter whether the burner is factory-made or home-made, if it is used incorrectly and if the gas cylinder is handled incorrectly, the following negative consequences are possible:
- fire occurrence;
- explosion of a gas cylinder;
- getting burned.
Burns can be caused not only by an open flame, but also by touching heated surfaces. To minimize risks, install the gas cylinder strictly in a vertical position on a flat surface, in a well-lit place, but not in direct sunlight or in a passage or doorway.
The distance from the cylinder to an open flame must be at least 10 meters, and from heat sources - at least 1 meter. Protect the cylinder from impacts and falls. Do not connect more than one burner to it.
Check the reducer quarterly, the burner monthly, and the hose daily. The need to check the hose daily is due to its vulnerability - even a slight mechanical impact can lead to ruptures and cracks, which will become the site of a gas leak, which must be excluded.
The risk of gas leakage also increases if the nozzle and tube are dirty, so it is necessary to clean them regularly. To inspect and maintain the burner, first disconnect it from the gas cylinder.
With timely maintenance of the torch, its flame will be powerful and stable, which will allow welding of many materials at temperatures of about 1000 °C
Do not warm up a frozen gearbox with an open flame. Operate the burner outdoors or in well-ventilated areas. Turn off the power supply if you work near electrical appliances, do not pinch or bend the hose, do not wrap it around your belt, etc.
After finishing the work, be sure to tighten the cylinder valve and put the protective cap on the cylinder.
Do-it-yourself gas burner from a blowtorch - Metalworker's Guide
A gas torch is a useful device; it can be useful for forges, soldering, and in many other cases.
This device can be bought, but a homemade gas burner works just as well, and it’s not that difficult to make.
It can be made quickly, the main thing is to follow all the rules so that the finished equipment is completely safe.
Of course, you will not be able to obtain the same power as industrial equipment, but for repairs and a number of small operations such a burner is quite suitable.
Scope of application after modification
Gas burners are used in households and agriculture, during construction and repair work, when repairing vehicles and equipment,
In addition to the listed areas, gas appliances are used for the following purposes:
- installation of heat shrink tubes;
- melting the solder before soldering;
- heating metal water pipes;
- heating bitumen for roof repair.
In addition to the above, the device is used for removing paintwork by firing the surface, for welding materials whose melting point is about 1000 C. With its help, you can cook or heat food or boil water for tea right on the construction site.
Manufacturing Features
The design features are that it is very easy to operate; there are no traces of soot or repulsive odors when using the gas burner. This device is compact and can be used virtually anywhere. The main component of the burner is the industrial valve. You can purchase a new part, however, and used ones that are in working order are quite suitable. The process of making a burner with your own hands begins with the handle, then the body and nozzle are made.
In order to obtain a burner that is safe to operate and does not waste fuel, you need to make it a rule to avoid scaling and adjusting the example circuits.
To be fair, it is worth noting that not all gas appliances are calculated according to the laws of gas dynamics. But if the manufacturer changes the dimensions of the design parts, then the Reynolds number of the fuel (or intake air) will go beyond the limits indicated in the original product. The burner with such “improvisation”, if we give an optimistic forecast, will begin to smoke and will be “gluttonous”, or even be completely dangerous in operation.
And one more important note regarding the manufacturing features of the burners: it is impossible to increase its power above 10 kW. And that's why
With a burner efficiency of 95% (which is an excellent indicator for an amateur invention), with a device power of 1 kW, it will take 50 W to self-heat. It is theoretically possible to get burned on the structure, but it is not fraught with explosion. But if you build a burner with a capacity of 20 kW, 1 kW will be superfluous. Threshold manifestation is expressed by the structure being hot or bursting into flames. Therefore, those burner drawings that are oriented at 7-8 kW should not be considered.
Burner design
A standard homemade burner functions this way. Gas is supplied under pressure through a special hose from the cylinder. Most often, propane is used as such gas. The volume of gas supplied is changed by a regulating operating valve located on the cylinder. Therefore, installation of an additional reduction gearbox is not required.
The shut-off valve is located behind the main valve and is mounted on the gas cylinder. It is used to open or close the gas supply. All other adjustments (length and intensity of the flame) of the burner itself are carried out using the so-called working tap. The gas supply hose through which gas is supplied is connected to a special nozzle. It ends with a nipple. It allows you to set the size (length) and intensity (speed) of the flame. The nipple together with the tube is placed in a special liner (metal cup). It is in it that the creation of a combustible mixture occurs, that is, the enrichment of propane with atmospheric oxygen. The created combustible mixture under pressure flows through the nozzle into the combustion area. To ensure a continuous combustion process, special holes are structurally provided in the nozzle. They perform the function of additional ventilation.
Based on this standard design, you can develop your own design. It will consist of the following elements:
- housing (usually made of metal);
- a reducer, which is attached to the cylinder (use a ready-made device);
- nozzles (made independently);
- fuel supply regulator (optional);
- head (the shape is selected based on the tasks being solved).
The burner body is made in the shape of a glass. The material used is ordinary steel. This shape allows for reliable protection against possible blowing out of the working flame. A handle is attached to the body. It can be made of various materials. The most important thing is that it provides convenience when working. Previous experience shows that the most optimal length of such a handle is in the range from 70 to 80 centimeters.
Gas burner device
A wooden holder is attached to the top. A gas supply hose is placed in its body. This allows you to give the structure a certain strength. The flame length can be adjusted in two ways. Using a reducer located on the gas cylinder and a valve installed on the tube. The gas mixture is ignited using a special nozzle.
Do-it-yourself gas burner from a blowtorch - Metals, equipment, instructions
What is a gas burner?
Many people are interested in the exact answer to this question. In short, this is a homemade propane device that has a huge number of advantages over its analogues. In this article we will try to understand exactly everything related to a homemade gas burner, and also answer the question “How to make a gas burner with your own hands?” Firstly, I would like to note the main features of this design. These include:
- extremely easy to use;
- no unpleasant or harmful odors, traces of soot, etc.;
- compactness, allowing the gas burner to be used almost anywhere.
Design of a homemade gas burner
The device of a homemade gas burner includes:
- metal case;
- gearbox;
- nozzle;
- fuel supply regulator;
- head;
- a unit for securing a gas cylinder.
The metal case includes a special glass, with the help of which the mechanism eliminates the possibility of blowing out the flame. This also includes a metal or other handle that does not exceed 100 centimeters .
A wooden holder and a gas hose are installed on top of the handle. Using a reducer and a tube with a valve, the gas supply level and its length are adjusted accordingly.
The nozzle is used to ignite the fuel, in this case the latter is propane.
Type of fuel the burner runs on
As mentioned earlier, a gas burner is also called a propane burner. From this it is easy to conclude that, as a rule, propane or a mixture of propane and butane is used as fuel.
A special cylinder is filled with this fuel and attached to the burner.
Do-it-yourself gas burner production
As you can understand from the list of elements of the entire design of the device, it is extremely simple and does not have any complex parts that require a lot of time.
In order to make the unit with your own hands, it will take a little time and effort. And if you correctly study the material presented in this article, as well as approach the process with all seriousness and accuracy (since the work is carried out with flammable substances), then it will definitely be completed.
As practice and many living examples show, on average, a person who has never created homemade gas burners, 40-45 minutes after reading the instructions, could already boast of a homemade burner.
How to make a gas burner with your own hands
Here we come to the most interesting process. To make a burner. Below we will describe in detail the entire process of creating this unit, taking into account all the nuances and tips.
So, you should start with the simplest, but no less interesting. From the manufacture of the burner handle . In principle, any material can be used. By the way, it would be more reasonable to simply use a ready-made handle from some old and unnecessary soldering iron. The supply tube is made exclusively of steel.
Do not forget to pay great attention to the dimensions of all parts. For example, the diameter of the burner supply tube should not exceed one centimeter, and its thickness should range from 2 to 2.5 mm. This tube is inserted into the handle and fixed with glue or other quality material suitable for the purpose.
Frame
The burner body, oddly enough, is also made of steel. It is best to use a brass rod, the width of which should be approximately 2 centimeters. The divider can also be made from it.
Next, several holes are made in order to create oxygen circulation in the unit . After all, as anyone knows: fire cannot exist without oxygen. The total number of such holes should be four: each with a diameter of about 1 millimeter. They are made in the very core of the burner divider.
The next step is to forcefully press the divider, which was worked with a little earlier, into the body of the gas device. The inner flange must be installed with some clearance of about half a centimeter. With the help of this gap in the future, a huge flow of gas approaching the igniter will be slowed down.
Nozzle
As mentioned earlier, the nozzle is used to supply fuel, namely propane, from its cylinder to the outside. To make it, you should use a special metal rod .
Here you will need a 2mm drill to make a blind hole in the nozzle. For the jumper we will need a 4mm drill.
The holes made are caulked with a hammer, and then sharpened using everyone’s favorite sandpaper.
After this, a hose from the gearbox is mounted on the end of the tube, which must be made of special rubber and fabric material. Fastening occurs with a regular clamp using a standard screwdriver.
After the mechanism, in your opinion, is correctly secured, you need to set the optimal pressure in the cylinder and supply gas from it. The air from the hose should then be completely displaced. The length of the fire, with the correct location and operation of all parts, should be about 40-50 mm.
In general, as mentioned earlier, a homemade gas burner is a rather unique tool that will come to the aid of any owner in any unpleasant everyday situations. And the maximum ease of its manufacture can only further attract all priorities to itself.
- Nikolay Ivanovich Matveev
Do-it-yourself homemade gas burner: review, features and how to make it - SibNovStroy
A gas torch is a useful device; it can be useful for forges, soldering, and in many other cases.
This device can be bought, but a homemade gas burner works just as well, and it’s not that difficult to make.
It can be made quickly, the main thing is to follow all the rules so that the finished equipment is completely safe.
Of course, you will not be able to obtain the same power as industrial equipment, but for repairs and a number of small operations such a burner is quite suitable.
Burner device
The soldering torch design includes the following elements:
- Housing made of refractory metal.
- Unit for installing a gas cylinder.
- Gearbox.
- Fuel regulator.
- Nozzle.
- Head.
The metal body must include the main element - a special metal glass that prevents the fire from being blown out. It is also important to make a handle on the body from metal or other material that is not exposed to high temperatures.
A nozzle is used to ignite the fire, and a reducer provides regulation of the gas supply. Most often, propane is used as fuel for burners, although industrial analogues can also use butane and other gas mixtures. The fuel is in a removable cylinder.
What do you need to prepare to make the device?
To make a soldering torch with your own hands, stock up on the following materials:
- Hoses.
- Metal tube, preferably brass.
- Metal for nozzles and dividers.
- The plates are made of refractory metal; wood can be used as an alternative.
- Gearbox.
- Sealing agent.
Production technology
First of all, you need to make a nozzle and a handle. The latter is made from a brass tube. attaching a handle made of a material with low thermal conductivity to it. Typically, wood is used in DIY production. However, if you have at your disposal a handle from any tool of suitable diameter, you can use it.
Device
A gasoline blowtorch consists of the following components:
- A burner designed to use a specific type of fuel. For example, a gas blowtorch will have a different burner design than a device using liquid fuel.
- Fuel tank.
- Systems for supplying the combustible mixture to the burner.
- Manual fuel supercharger (pump).
- Shut-off and control device.
- Check valve (not available in all designs).
- Holding handle.
To achieve compactness, the booster pump is located directly in the tank. Before use, the user should pump the pump several times to create the required vacuum level: then the fuel will flow to the regulator.
The fuel supply system is extremely simple, and works on the principle of a locking needle: when such a needle moves in the cross section of the regulator, the pressure of the mixture changes, which determines a certain rate of fuel supply to the burner. Such pumping should be done periodically, as the external characteristics of the flame change. On the contrary, if work with the blowtorch is completed, then the pressure must be released. In modern devices, a check valve is used for this purpose; in lamps of an older design, the tank lid is simply opened slightly.
Some types of blowtorches are equipped with a remote burner, which is equipped with a long hose. In this case, an ordinary bulb made of gasoline and oil resistant rubber is used as a supercharger. A nipple inlet is used to connect the hose to the bulb and the tank body.
There is a valve on the end surface of the regulator, by opening which you can ensure the supply of gasoline mixture to the fuel-burning device. Under the pressure of the mixture, the regulator needle moves and opens access to the burner working space. From there the mixture enters the nozzle, is dispersed and ignited.
Babington waste oil burner - how to make it yourself
When using waste oils for heating a private home, an eternal problem arises - preliminary preparation of fuel, purification from impurities and water.
The Babington burner, which burns waste and other liquid fuels of any quality, will help to simplify the task. Since its design and operating principle are of considerable interest, we will consider these issues in this material.
At the same time, we’ll tell you how to make an “omnivorous” oil burner with your own hands.
Operating principle of the Babington burner
A few words about the history of the invention. The considered method of burning heavy fractions of liquid fuel appeared relatively recently - in the middle of the last century. More precisely, inventor Robert S. Babington (RS Babington) patented his diesel burner in 1969. However, the patent has long expired and now its device is available to everyone interested.
Babington’s invention is fundamentally different in operating principle from traditional oil burners, where a mixture of air and fuel is injected by a nozzle under pressure:
- Exhaust or diesel is supplied from the tank by a low-capacity pump.
- Fuel drips onto the working surface - spherical or inclined. The fuel flows down along it, forming a thin film.
- In the center of this surface there is a hole of small diameter (no more than 0.3 mm), through which the compressor pumps compressed air.
- A Babington waste oil burner operates on the following principle: a stream of compressed air exiting through a small orifice under pressure tears off part of the oil film from the surface.
- As a result, we obtain a jet of air-fuel mixture, which, after ignition, forms a stable flame. It is sent to the firebox of a furnace or boiler, heating the walls of the chamber or the water jacket. The figure below shows the operation diagram of the burner device:
Since some of the fuel flows past the hole, it flows back into the tank
Here you can clearly see that the unburned waste oil residues flow from the hemisphere into a special container, and from there back into the main tank. From it, the fuel is supplied for combustion under low pressure, and is preheated to liquefy it. As you can see, the design does not provide any filter elements.
Preheating waste oil or diesel fuel before burning it with a Babington burner is very important and here's why:
- The heated waste liquefies and forms a thinner film on the working surface, which is well atomized by the air flow. This promotes more efficient combustion.
- The smaller the droplets of liquid fuel suspended in the stream, the easier it is to ignite a boiler or Babington stove in manual/automatic mode.
Reference. Finding and buying a ready-made Babington burner in a factory version is unrealistic. Well-known manufacturers of oil and diesel units, for example, KROLL or EURONORD, do not produce them. There is only one way out - order a burner from a good craftsman or make it yourself.
Pros and cons of the Babington burner
The peculiarity of this type of burner devices is that their positive and negative sides balance each other.
As you might have guessed, the main advantage is the use of heavy liquid fuels of any quality.
Even with a large number of impurities in the used oil, a homemade air-pressurized burner will function properly (unlike other furnaces made to use similar fuel).
The presence of water or automobile antifreeze in the waste stream (within reasonable limits) is not a hindrance, although minor malfunctions may occur. The fact is that the surface tension of water is higher than that of liquid hydrocarbons.
Accordingly, the waste film is more easily torn off from the working surface under the influence of air pressure in a Babington burner.
If there is a little water in the oil, then the latter practically does not enter the combustion zone, but flows down into the sump.
Advice. It is still not worth abusing the “omnivorous” nature of the burner device. It is better to pass the waste through a coarse mesh filter before use.
Another pleasant fact for the user is the large selection of types of liquid fuel used. True, when switching from one to another, you will have to reconfigure the burner according to the dosage of fuel and air. Here is a list of these types:
- waste oils and fuels and lubricants of any origin and viscosity - from cars, machine tools and other machines and mechanisms;
- diesel fuel and biodiesel;
- fresh, old and burnt vegetable oils;
- fuel oil;
- light heating oil, kerosene.
The waste oil is preheated in a tube surrounding the burner body
Now about the shortcomings, of which there are also plenty:
- The Babington oil burner is a relatively simple device. But the system of dosed fuel supply and drainage will be more complicated. The circuit involves 2 containers, a pump and a fuel path with combustion intensity control. It is important to ensure the quality of the connections, otherwise the oil will begin to leak.
- When using liquid fuels, especially waste fuel, the boiler room is rarely clean. You must understand that dirt and odors in the furnace room are inevitable. The disadvantage manifests itself in the process of setting up a Babington burner to work together with a homemade stove or boiler. This also includes reconfiguring equipment to switch from mining to diesel, fuel oil or vegetable fuel.
- Occasionally, malfunctions occur during the operation of the burner due to the fact that the nozzle, or more precisely, the tiny air hole, becomes clogged. Most likely, the reason lies on the compressor side. For example, wear of the piston group leads to oil from the crankcase entering the nozzle and can cause failures.
Separately, it is worth mentioning fire safety measures. When performing work related to the installation of an oil burner device, it is recommended to keep a fire extinguisher on hand. The latter must always be located in the boiler room.
How to make a burner yourself
To understand how to make a Babington burner device, you need to study its design from the drawings. You can find quite a few of these on the Internet, but for manufacturing it is better to adopt the experience of specialists and use a proven prototype for work. Below is a drawing of a burner made and tested by one of the experienced participants in one of the specialized forums:
Now a few words about what the unit can be made from according to this drawing. The author used a regular steel tee with threads for connecting pipes with a diameter of 2 inches (DN50) as a body. Instead of a tee, a cross of the same size will do. The remaining elements are in accordance with the list:
- Any metal part with a hemispherical end can act as a
hemispherical nozzle or a hollow ball for a Babington burner. There are several options - starting from a brass door handle and ending with various spherical nuts. - The nozzle is made from a metal pipe with an external pipe thread, length – 150-200 mm.
- Copper tube with a diameter of 10 mm for the fuel path.
- Metal tube for organizing air supply. Diameter – at least 10 mm.
- Threaded fittings are used to connect a copper tube to the body.
You will also need a small pump to pump used oil. Units from a VAZ car or motorcycle cope well with this task; you just need to ensure their rotation from an electric motor. Any low-power compressor is suitable, including one from a refrigerator, since the pressure in the air path should be low (nominal - about 2 Bar, maximum - 4 Bar).
Advice. To dose or shut off the fuel line, it is necessary to install a special valve on it.
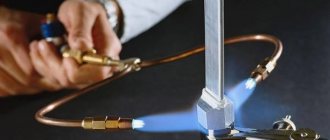
An important operation is to drill a calibrated hole of very small diameter in the improvised nozzle. But first you need to select a drill of the required size, because the power of the future homemade Babington burner will depend on the size of the hole. Calculating power will be discussed in the next section, and how to make a small hole yourself is shown in detail in the video:
Power selection
The trick is that it is quite difficult to independently make such a calculation using formulas.
There is data obtained in practice, and it says that different craftsmen make one or more holes with a diameter of 0.1 to 0.3 mm.
There is also more accurate information: if you make a burner with 1 hole measuring 0.25 mm, you will be able to achieve a boiler power of up to 15 kW (depending on the type of fuel).
Advice. Do not drill a hole that is too large (more than 0.3 mm), this will lead to poor atomization and combustion of the waste. In addition, the device will be more difficult to ignite, and the consumption of liquid fuel will increase unjustifiably.
Based on these data, you can select the thermal power of the unit by the number of holes. To reach 30-35 kW, you will have to drill not one hole 0.25 mm, but two.
Moreover, the distance between them must be maintained at least 8 mm so that the torches of the air-fuel mixture do not extinguish each other. According to experience, when operating a Babington burner, exhaust through one hole is 0.
25 mm, the approximate oil consumption in maximum mode will be up to 2 liters per hour.
Manufacturing recommendations
When the hole is ready, you need to attach an air supply tube to the ball and install it inside the tee. To ensure a sealed exit of the tube from the housing, you will have to make a threaded plug.
A hole is drilled in it, where the tube is inserted. A fitting is cut into the tee from above by soldering, and a copper fuel supply line is connected to it.
To heat used oil before burning, we use the following methods:
- An electric heating element with a thermostat is built into the tank, from where the waste material is supplied to the hemisphere.
- The tube leading from the tank makes several turns around the heated nozzle, due to which the fuel passing through it heats up.
A nozzle is first screwed to the tee, and then a copper tube pre-bent into a spiral is put on it. And only then it connects to the fitting. By the way, 2 holes with a diameter of at least 8 mm should be made in the nozzle for the intake of secondary air. A detailed description of how to make a Babington burner yourself is given in the video below:
The lower outlet from the tee is designed to drain used oil into the settling tank. It can be placed directly under the burner, but this is not aesthetically pleasing and unsafe - the flame is too close.
It’s better to take the tank to the side and come up with a fitting with a screw plug and a tube to drain the waste.
Anyone who is strong in the field of electronics can attach an automatic ignition and safety kit with a controller to the burner.
Electrical ignition can be provided by one or two automotive spark plugs screwed into the beginning of the nozzle.
This will make it possible to stop and start the boiler automatically, shutting off and resuming the supply of waste oil and air to the burner.
The controller can receive signals from the flame sensor, water temperature in the boiler and fuel level in the tank and, based on them, turn off the pump and close the fuel line valve.
About converting a blowtorch for testing
Some home craftsmen, having studied the operating principle of the Babington burner, are trying to convert an ordinary blowtorch to burn waste oil. The goal is to reduce the cost and simplify manufacturing, because the processes in these two devices are supposedly similar. This opinion is erroneous, since a blowtorch functions differently than the homemade burner described here.
In the lamp, air is pumped into a tank of gasoline with one purpose - to push it out and deliver it to the nozzle. In this case, the fuel goes through the stage of heating and evaporation.
The nozzle supplies gasoline vapor to the combustion zone; the liquid can be observed there only at the ignition stage, when the “head” of the blowtorch has not yet warmed up.
The used oil will not be able to evaporate and the nozzle will supply it in the form of large droplets, which does not contribute to normal combustion. And the cross-section of the jet will quickly become clogged with various impurities.
The conclusion is simple: it will not be possible to convert a blowtorch to burn heavy liquid fuel.
Conclusion
At the moment, a universal burner operating on the Babington principle is the prerogative of home-made craftsmen. Although it has a lot of advantages, well-known brands are in no hurry to start producing such units. It can be assumed that the reason for this is the fire hazard of such a product and the projected price being too high due to the complex fuel-air supply system.