The steel cable was invented in 1834. It has many advantages, such as high tensile strength , stable and reliable performance, and high ability to withstand dynamic loads and overloads. It is widely used in lifting, conveying and traction systems. During the operation of steel ropes, defects and damage will occur: wire breakage, wear, rust, fatigue, strand breakage and even sudden breakage for various reasons. Therefore, academia and industry are trying to explore various damage detection methods to ensure their reliability and safety.
However, due to the complexity of the structure, the diversity of the operating environment and the limitations of detection methods, it has become a difficult problem. The development of relevant technologies is slow. It is difficult to achieve efficient and reliable industrial applications.
Nowadays, manual inspection and installation with manual touch is still the main method in most cases.
Take for example: On March 9, 2022, while lifting, the steel rope of a mining company's multi-rope friction mine hoist suddenly broke. The fire in the cabin was aggravated by a broken cable. As a result of the incident, 17 people were killed, trapped in cages. Therefore, it is very important to learn reliable and effective methods for securing metal cable.
The end of the wire rope wears out and cannot be easily connected to the plant or equipment, but there are various ways to secure the ends of the wire rope to prevent it from fraying.
Cable
A wire rope is a complex mechanical device that has many moving parts that work in tandem to support and move an object or load. In the lifting and rigging industries, a wire rope is attached to a crane or hoist and equipped with swivels, shackles, or hooks to secure it to a load. It is also used to raise and lower elevators and support suspension bridges or towers.
The cable is metal and has a unique design consisting of steel wires that form individual strands laid in a spiral around a central core.
Steel rope is the preferred lifting device for many reasons. Its unique design consists of multiple steel wires that form individual strands that are laid in a spiral around a core. This structure provides strength, flexibility and the ability to cope with bending stresses. Different material, wire, and strand structure configurations will provide different benefits for a specific lifting application, including:
- force;
- flexibility;
- abrasion resistance;
- crush resistance;
- fatigue resistance;
- corrosion resistance;
- rotation resistance.
However, how you attach ropes to your lift requires careful consideration. Our goal is to help you understand what devices are available for securing the ends of wire rope to load handling devices, methods for attaching a load rope to a drum, as well as other methods of fastening and securing steel ropes. This will allow you to choose the most efficient installation method and long-lasting performance of the metal cable.
Types of sewer blockages
Understanding their nature is very important for proper selection of cables. Plumbing plugs differ in the reasons for their occurrence, and accordingly, their strength can also vary.
Plumbing plug in the knee
Operational blockage
An inevitable problem with any sewerage system. It occurs due to the fact that particles of food, grease, fabric, hair, wool, sand and other very small debris are washed into the kitchen sink, which accumulate on the walls of the pipes for months and years, forming dense plugs. To remove them, a thin cord will be enough, since such a blockage is called the simplest.
Mechanical plugs
They appear due to large solid objects or plastic bags flushed down the toilet, which become a wedge in the pipe, collecting the rest of the garbage. To remove such a blockage, it is necessary to use a powerful, thick drain cleaning cable, which will forcefully damage and push the stuck object. If the object is very durable, then the device will not be able to damage it, and you will have to:
- calculate the approximate location of the plug using the length of the cable;
- cut the pipe;
- physically remove it.
Technological blockage
It occurs as a natural process of deposition of solid fractions on pipes.
Technological sewer blockage
They have a very strong structure and are located almost along the entire length of the sewer pipe. Here, even a powerful cable is unlikely to help, except to temporarily make a hole for draining wastewater. This requires a complete replacement of the pipes.
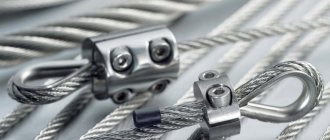
Crimp sleeves
Crimping sleeves for steel cable assemblies are one of the frequently performed functions of equipment for lighter operating conditions.
The question often arises , which is better, crimp ends or wire rope clamps?
Steel Cable Clamps and Crimping Sleeves
Crimp sleeves, stronger and more efficient. Requires no future maintenance or re-tightening of nuts. It has a streamlined shape than metal rope clamps.
Crimping refers to the process of using a tool or machine to apply force to a bushing or ferrule. As a result of this process, the sleeve is sealed on and around the cable portion.
Sleeve crimp
Aluminum crimp fittings
Most often, an aluminum cable clamp is used with galvanized steel cable to form cable assemblies.
Aluminum sleeve placed on a galvanized cable
Aluminum is soft. When compressed, using a crimping tool, it will be pressed into the grooves of the rope , locking the aluminum sleeve in place.
Aluminum sleeve in cable
Installation
Passing the steel rope through the sleeve.
Pass the cable through the sleeve
Before crimping, make sure that the “cut end” of the steel rope sticks out to a length of at least 2 cable diameters. This ensures full contact with the cable as the sleeve expands during crimping.
Two cable diameters
Place the sleeve into the jaws of the tool.
Sleeve correctly in the tool
Sleeve incorrectly in tool
Pay attention to the correct orientation of the crimping tool cavity with the aluminum bushing.
The sleeve should always be aligned vertically, not horizontally.
Keeping the case in the correct position, make your first crimp by squeezing the crimping tool handles together until the jaws are completely closed.
Forging
Sleeve crimp
For each sleeve size there is a prescribed number of crimps that must be completed.
Leave a little space between each crimp. Your finished assembly should look like the image shown.
Crimping distance
For 1/16" and 3/32" sleeves, 2 crimps will be required.
For 1/8" and 5/32" sleeves, 3 crimps will be required. For 3/16 and 1/4" sleeves, 4 crimps will be required. For 5/16 and 3/8" sleeves, 5 crimps will be required.
Pressure gauge
To ensure that the crimps are done correctly, use a calibrator.
Pressure gauge
Using the appropriate measuring cavity, slide the sensor onto the sleeve.
If the pressure gauge rotates freely around the crimp zone, then everything is done correctly.
The pressure gauge rotates freely around the crimp area
If the sensor does not slip in the crimp area, use a re-crimp tool to ensure that the coupling has been fully compressed.
Steel rope with polymer coating
It is recommended to trim the vinyl far enough to ensure that the sleeve makes direct contact with the cable.
Vinyl coated cable
Using the same crimping method, elbow joints can be made to connect two pieces of cable.
Knee connection
Remember to leave a small area between the sleeves.
Small area between sleeves
Extend the end of the metal cable beyond the outer edge of the coupling at least 2 cable diameters.
Cable end
Zinc Copper Sleeves
Zinc, copper and glass sleeves are recommended for stainless steel wire ropes.
Zinc and copper hoses
Aluminum sleeves are not recommended for use with stainless steel cables due to the possibility of corrosion of aluminum upon contact with stainless steel. Over time, this can lead to weakening of the contact between the coupling and the cable.
How to make a cable with your own hands
As can be seen from the description above, a steel cord of at least 5 meters long is required. For maximum efficiency, one end is equipped with a curved handle for scrolling inside the pipes, and the other end is broken with a powerful blow of a hammer, turning into a sharp brush.
This brush is called a tip; it can damage the plug and push it further along the pipe, freeing the passage.
To make the mechanism more efficient, the core can be wrapped in a spiral, for which rigid wire is used. It must be firmly secured.
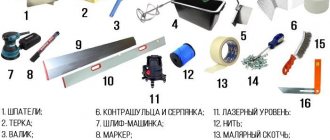
A set of special attachments for cleaning cables
To make your own, use only reliable and durable metal. If it becomes damaged while moving through the pipe, it can only be removed by dismantling most of the sewer pipes.
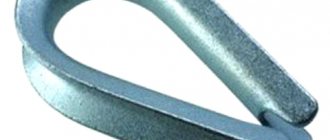
Koush
Eyelet for steel ropes is a special mandrel for a cable loop, made of steel or soft materials. When the wire rope anchorage is limited to a loop, there is a risk that it will bend when the loop is connected to a device that concentrates the load over a relatively small area. A thimble is installed inside the loop to maintain its natural shape and protect the steel rope from pinching and abrasion inside the loop. Using thimble in loops is industry best practice. The thimble prevents direct contact of the load with the steel rope.
Conventional steel rope ending in a loop
Protective function
The outer side of the tip is made in the form of a groove (groove) into which the cable fits tightly. This frame, in itself, is close to the contour of the drop.
Thanks to this design, the cable tip located in the groove does not come into contact with the part (element) that is attached to the loop. The sides of the thimble groove prevent the loop from slipping off it, and also protect the cable from lateral damage, although there it is least susceptible to wear and other mechanical stress.
The hose for steel ropes is made of carbon steel and also of plastic. Steel is produced by casting, stamping or forging and then galvanizing or painting to protect against corrosion. Structurally, the thimble is one-piece or composite, consisting of several parts. One of the types of such mandrels is shown in the photographs below. This is a teardrop-shaped thimble.
How to choose a thimble for a steel rope
After repeated use, under loads, wear and kinks, it reduces the strength of the rope and leads to premature failure.
Thimbles are produced in two classes:
- lungs;
- heavy.
Lightweight thimbles are used in static applications such as permanent installations, controlled environments of ISO 14644 cleanroom standards or in situations where heavy loads are not experienced.
For light loads
For light loads
Light-duty thimbles work best on traditional fiber ropes because they can handle the load of a rougher setup. Here you will see that this lightweight thimble is suitable for this application, while the heavy thimble is greatly oversized.
Heavy-duty thimble
High-strength thimbles have expanded protective material around the edges to resist deformation. They are used for devices that are subject to dynamic loading or conditions close to the operating load limit. Heavy duty thimbles are suitable for lifting or towing applications where the user will need to frequently attach and detach the thimble to other rigging components.
Which experience dynamic load
When choosing a thimble for a metal cable, it is important to consider the environment in which it will be used.
Manufacturing materials:
- Cink Steel;
- hot-dip galvanized steel;
- stainless steel.
Stainless steel thimbles are better suited for outdoor and are rust resistant. Also suitable for use in or near salt water where corrosion often occurs, and is a better choice when using rope or chain of the same material.
Galvanized ferrules are less expensive than stainless steel and are also suitable for outdoor use. Galvanized components may show signs of surface rust. If the galvanized coating wears on the load-bearing or contact areas of a component, this type of surface rust will usually wear off under stress and should not affect the performance of the component.
Types of thimbles
It is important to remember that the zinc coating is thinner than hot-dip galvanized steel, so a thimble may show signs of rust sooner than a spray-galvanized thimble.
Fixing the cable in the braid
Steel cable in PVC braid and thimble can be used to form rigging units. In this case, make sure that the fasteners are of the correct size and securely fastened to the eye of the cable being used. If the fastening is loose in the groove, the cable may fall out , and if it is too small or too large, connections to other devices of the correct size will become difficult.
Braided steel cable
When choosing PVC sheathed steel cable, it is important to match the size to the actual diameter of the cable you are using with it. The diameter of polymer coated wire rope is confusing because some manufacturers measure braided steel wire rope differently.
Vinyl Covered Cable Measurement Actual Cable Diameter
The diameter of the vinyl cover adds thickness.
With other rigging components
Often a thimble for steel ropes is used with other rigging components , such as an eye-bolt, and a minimum of effort is required to straighten the eye of the thimble. Use a set of pliers to hold each side and twist it open so the component can be inserted into the thimble and then return it to its normal shape.
Unbend the eye Open and insert with eyebolt
The same process can be done by hand if the thimble is small enough.
Return him to normal form
Some thimbles cannot be bent using pliers or your hands, so for larger mounts, it is preferable to use a vice and pipe.
Use a vice Open with a pipe
What are steel rope clamps made from?
In order to obtain high-quality clamps, the manufacturer uses high-strength steel. To make it more reliable, the surface of the product must be covered with a special protective coating - galvanic galvanization.
Using galvanization, you can make all products more resistant to aggressive environmental influences, rust and corrosion. The galvanized cable clamp is considered one of the most durable.
Asymmetric wedge clamp
The use of asymmetrical wedge couplings is popular with mobile cranes. They are easy to install on site and also easy to remove, which is a big advantage.
Clamp with a short piece of cable
The end wedge sockets are reused after the cable has been discarded. They withstand fatigue tests until the steel rope fails and without damage.
Standardization
There are many options on the market, with minimal requirements for asymmetrical wedge mounts. The length of the clamp between the coupling and the wedge must be at least 4.3 times the nominal diameter of the wire rope. The asymmetrical wedge coupling can withstand 75,000 tension-extension cycles from 15% to 30% of the minimum tensile strength of the wire rope without permanent damage.
Working mechanism
Using a wedge, the end of the cable is wedged into the cone mount. As the load increases, the wedge is drawn deeper and deeper into the socket and exerts a clamping force on the steel rope.
The traction force in the cable is transmitted due to friction between the metal rope and the wedge and friction between the cable and the coupling. The figure shows a cross-sectional view of an asymmetrical wedge socket.
Sectional view of an asymmetrical wedge socket
Installation
Depending on the design and type of rope, their efficiency varies from 75% to 80%. Please contact your wedge mount manufacturer for details.
When installing a wedge socket , the end of the metal rope is first fed through the tapered socket, then bent into a loop and returned from the socket. After this, the wedge with the cable is placed inside the loop, and the protruding ends are pulled further out of the socket, so that the wedge is well retracted into it.
Then the “dead” end of the cable should protrude from the fastener by at least a few centimeters. Directly at the outlet, the tail end should be protected with a cable clamp . This will prevent the wedge from weakening and falling out.
Here's a quick rundown of the dos and don'ts:
- Always check the socket, wedge and pin before installation;
- Align the end of the metal cable with the center line;
- Use a hammer to seat the wedge and cable as far into the mount as possible;
- First apply a load to completely seat the wedge and cable in the socket;
- Make sure the end is properly secured before inserting the wire rope.
Failure to comply with this requirement will result in core slipping or weakening of the strands, which will lead to serious damage to the steel cable.
Secure the dead end of the cable.
Incorrect connection between the live and dead part of the cable
Incorrect cable installation
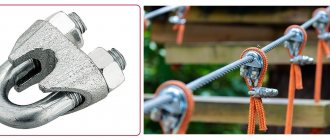
At the scene, it was discovered that the end of the steel cable on the crane was not installed correctly. Before work began on the ground site, the 30-tonne mobile crane was inspected and it was discovered that the rope clamp (bulldog) attached to the "dead end" of the hoist ropes was incorrectly installed , which caused the destruction and damage to the "live end" of the rope (part of the rope , which takes the load).
Incorrect installation of cable grips
Incorrect selection or installation of wire rope grips will dramatically reduce the effectiveness of wire rope leads and cause the metal cable to slip through the grips. This may result in personal injury and equipment damage.
The clamp bridge is installed on the working part (current end) of the rope, and the U-shaped bolt is installed on the tail cable (dead end) of the steel rope.
Methods for fastening the ends of a steel rope
The following lessons were learned:
- Make sure that when tying a metal cable, the correct type of clamp is selected;
- Make sure the cable grips are installed correctly.
Beware of signs that indicate a cliff; for example, reduction in rope diameter, corrosion or deformation of the steel rope.
How to use clamps correctly
Some rules require that the dead line be clamped together with another short piece of rope.
Clamp with a short piece of cable
However, the best solution is to let the stub stick out further and bend it back into a loop. The “dead” line can be cut off, along with its own end at the exit from the fastening.
Bend back into a loop
This procedure has the advantage:
- bending the line around a small radius of the wedge creates permanent deformation inside the wire rope;
- Bend-like plastic deformation makes it difficult to push the end of the rope through the hook block.
If the asymmetrical wedge socket is installed correctly , the cable line is in the straight direction (Fig. 1). The tensile tension line runs straight through the mounting pin. Therefore, when the connection is loaded, it will not bend and bend the live line at its output.
If installed incorrectly , the traction line will be misaligned; therefore, whenever the joint is loaded, it tilts to equalize tension with the clamping pin, thereby strongly bending the "stress" line at the clamp exit (Fig. 2).
Installation
Special designs
The number of special designs, wedge clamps for cables, is extensive. Types vary depending on material, manufacturing processes (cast and welded construction), geometry (wedge angles ranging from 14 to 30), and method of securing the dead rope line.
The asymmetrical wedge fastening design secures the dead rope line to the rope socket body.
Attaching the “dead” part of the cable to the socket body
A wedge socket with an extended wedge to which the “dead” end of the rope is attached.
Attaching the “dead” part of the cable to the wedge
When using rotation-resistant steel ropes , it is recommended to install a swivel between the end connection of the rope and the point of attachment to the crane. However, the lifting height of the device will be reduced by installing a swivel. Here it is recommended to use an asymmetrical wedge socket with an integrated swivel.
This end connection reduces lift height slightly and has the added benefit that the swivel always automatically aligns with the cable.
Wedge socket with integrated hinge
Symmetrical wedge socket, used as an end connection for elevator ropes. It can be easily attached and also easily removed , which is a great advantage when manually adjusting the length of the lifting ropes.
Symmetrical wedge socket
Instructions for installing clamps
When using the most popular DIN 741 clamp, it is necessary to insert both ends of the cable into the clamp selected for the size of the cable, and insert the thimble into the resulting loop. The clamp should be secured with nuts so that its steel base is on the side of the load-bearing (long) end. For reliability, 2-3 clamps are usually installed in a row. How to fasten the cable clamps in one unit can be clearly seen in the picture below.
The tightening force of the nuts is selected experimentally. After installation, a load test is carried out. If the clamps do not move or cut the cable, then they are installed correctly. Otherwise, adjustments must be made at the moment of tightening. Similar recommendations apply to flat clamps.
If the clamps are used for a long time, the clamping force should be checked periodically. It may change over time due to changes in temperature and humidity.
Installing cable clamps is a critical operation. Compliance with the basic installation rules and full control over the process is the key to the reliability of the entire structure.
Flemish eye
Eye Splice - Used to splice the free end of a cable to form a loop. The threads of the end of the cable are unwound over a certain distance. The wire is then bent around so that the end of the unfolded length forms a peephole. Next, the unfolded strands are braided back into the wire rope, forming a loop or eye - called a Flemish eye.
Flemish eye connection
The threads of the end of the cable unwind to a certain distance
Consists of a combination of splicing and pressing. Steel rope slings are often used in steel mills where the ropes are exposed to high temperatures and serve as a replacement for thimble splices.
Splicing and pressing
Flemish eye end connections can be used at temperatures from 60 C to + 400 C. At temperatures from + 250 C to + 400 C, the load capacity of the ropes should be reduced to 75%.
Standardization
The types of Flemish eyes are designated as follows:
- Flemish eyes without a thimble.
- Flemish eyes with a thimble.
Various designs of the Flemish eye
Manufacturing and installation
The rope sling, which has not yet been processed, is pulled through the selected steel clamp (Fig. A).
Making a loop of steel rope
The outer threads of the lifting rope are divided into the required lengths (Fig. B).
The core of the rope sling is bent back and formed into a loop. The loose cable halves are then closed around the cable core. For example, the core of an eight-strand rope is closed on the right and left with only four threads until the threads on both sides are joined at the head of the loop (Fig. C).
As the outer strands of the rope have been completely enclosed around the rope core (Figure D), a steel clamp slides over the ends of the strands and is pressed.
Fire on a rope or cable
Speaking about how to braid a cable - steel or from another material, it should be mentioned that you can make a fire. It's a little more complicated. At some distance from the end of the cable, a durable temporary mark is made, and the ends of its strands are secured with the same marks. After this, you should unravel the end of the rope.
In the form of a loop, the cable is laid on a surface (preferably hard), all its strands are broken through
Several punches are made, but special attention is paid to the first one, since it is the most important of them. The reliability and strength of the fire is ensured mainly by the first punching. This is also an acceptable way to braid a cable.
The scheme will not cause any difficulties
This is also an acceptable way to braid a cable. The scheme will not cause any difficulties.
Filling couplings
Filled coupling for steel rope, used for the manufacture of high-strength, permanent contacts; they are created by inserting a wire rope into the narrow end of a conical cavity that is oriented according to the intended direction of deformation. Individual wires are laid inside the cone, and then the cone is filled with molten solder, tin. In modern conditions, compounds with unsaturated polyester resin are increasingly being used. In this section, we will consider the stages of pouring a steel rope with a resin mixture.
Pouring resin mixture
Principle of operation
As the resin cures, shrinkage occurs, which creates a frictional bond with the wires. Silica is mixed with a resin mixture to impart frictional adhesion properties. Silicon dioxide also serves to absorb heat caused by the chemical reaction that occurs when a hardener is added to the resin.
When a load is applied to the rope, a cone of resin is pulled down into the bell bowl. The cone shape causes compression of the hardened resin against the individual wires and the walls of the socket. The compression creates enormous adhesion, friction between the wire and the resin, resulting in a strength that exceeds the tensile strength of the rope.
Cured resin
Precautionary measures
- Inspect the inside of the bowl to determine if there are any indentations in the socket. If there are grooves, fill them with putty.
- To grip the wire, use only soft annealed iron wire.
- The resin must be thickened and cured before use.
- Do not use oversized rope sockets.
- Do not use resin after the expiration date.
Do not heat the socket before pouring the resin to speed up the curing of the resin, this will cause the resin to gel prematurely before reaching the bottom of the socket bowl. This will cause the build to fail.
Carefully! Exposure to some strong chemicals can affect the cured resin and weaken the assembly.
Contact the distributor or manufacturer if this occurs.
Safety precautions
When working with resin or hardener, it is recommended to use safety glasses and protective clothing , as well as impermeable gloves.
Always work in a ventilated area.
If an aggressive substance comes into contact with your skin, wash with soap and water and remove contaminated clothing. In case of contact with eyes, rinse with clean water for at least 15 minutes. If irritation persists, consult a doctor.
If contents are swallowed, do not induce vomiting. Drink milk or water to dilute and seek medical attention.
If you inhale excess fumes, move to a fresh air area. If breathing stops or becomes difficult, consult a doctor.
Do not point an open flame at the socket lock. Keep away from heat sources. Resin is a flammable liquid.
When using chemicals, always refer to the safety data sheet.
Safety precautions when working with resin
Temperature
The lifting rope, socket and resin should be stored indoors to keep the assembly components at a higher temperature. It is best if all three components are at the same storage temperature. If these three ingredients are stored at room temperature, booster packs should not be used at low temperatures.
It is not recommended to aggressively apply heat (flame) to the socket before pouring, as high temperatures will cause the resin to gel prematurely and prevent the resin from penetrating into the bottom of the socket cone.
Wrapping the rosette in a thermal blanket to facilitate controlled and even heating is a safe and effective method of speeding up the curing process.
Installation instructions
To achieve results, it is important to understand the procedure and the necessary steps for a safe and economical method of fastening, steel rope and socket.
Measure the socket, from the bottom to the top of the bowl, to determine where to apply the clamp cable.
The end of the steel rope must be long so that the wires, after laying, are level or slightly below the top of the socket bowl.
Measure the socket
Place the socket on the steel rope
Socket on a rope
Grip wire at the base of the socket
Place the clamping wire on one (Fig. A). The length of the grip must be at least twice the diameter of the rope (Fig. B).
For plastic-coated wire rope, the braiding is removed from the winding area.
Apply the gripping wire at the base of the socket
To grip the wire, use only soft annealed iron wire.
End of a wire rope
Use a spike and begin to open the strands (Figure D).
Use a short piece of pipe and bend each strand at a 60 degree angle (Figure E).
Open the strands evenly as shown here (Figure F).
If the cable has a vinyl covering, remove it.
End of a broom wire rope
The right broom for the flood nest
Tension is applied to the completed socket assembly. The friction between the cured resin and the wires must exceed the friction between the outside of the resin cone and the inside wall of the socket, preventing the wires from being pulled out and allowing the resin cone to shrink and shrink. The compression that is created between the wires and the polymer cone becomes stronger than the cable itself. For proper friction it is very important that the end of the rope is properly prepared and opened all the way so that the resin reaches the bottom of the socket bowl. See illustration below.
Properly maintained wire rope end
Clean wires
Thoroughly cleaned wires provide greater adhesion ; therefore, providing more friction which helps ensure the resin cone is properly secured and creates compression to ensure the required strength of the assembly.
Align vertically when pouring resin
A socket assembly that has been properly aligned when pouring the socket will allow forces to be evenly distributed across the wire and resin cone; therefore having a strength greater than a rope. If the rope is not aligned properly when pouring resin into the socket, i.e., the rope will be installed at an angle. Tests have shown that when this happens, the rope will break at the lower base of the nest.
Clean end of rope
Place the hardened end of the wire rope in the solvent and make sure the wires are clean from the bottom of the broom to the grip tape. After cleaning the end of the rope, wait until all the solvent has evaporated and the wires are dry.
Clean end of rope
To achieve results, it is recommended to use a pure solvent.
Insert the broom into the nest
Place the socket on the wire broom. Make sure that the rope wires are evenly spaced in the socket bowl, the ends of the wires are slightly below the top edge of the bowl, and the axis of the rope and the socket are aligned.
The top of the grip should be level with the bottom of the socket. Do not allow any wire to extend below the base of the socket.
Insert the broom into the nest
Sealing the bottom of the socket
Wrap the bottom of the socket with spackling putty. Make sure the putty is pressed into the groove between the strands.
To ensure a better seal, wrap the caulk with electrical tape.
Sealing the bottom of the socket
Mix resin
Knead the resin pack for 30 seconds, thoroughly stirring the resin (silicon dioxide).
Cut open the resin bag and squeeze out the contents into the included mixing container.
Cut open the hardener bag and squeeze the contents into the resin.
Using a mixing paddle, thoroughly mix the resin and hardener until the color is uniform.
Proper mixing is necessary to achieve 100% effectiveness.
Mix resin
Pour the resin mixture into the socket
After mixing the resin and hardener, immediately prepare to pour it into the socket.
Position the funnel so that the resin flows out of the funnel into the bowl, along the side of the nest.
This will help the resin reach the bottom of the bowl and reduce the chance of air being trapped.
Fill to the top of the bowl.
Allow the resin to set firmly before moving the assembly. Moving the assembly prematurely may damage the resin before it cures and reduce effectiveness.
When following the resin manufacturer's recommended procedures, completion efficiency reaches 100%
Pour the resin mixture into the socket
Re-lubricating the wire rope
After the resin has cured, re-lubricate the cable to replace any lubricant that may have been removed during the cleaning process.
Wire rope lubrication
It is recommended to check the load on the assembly before using it.
Tools
Steel is a material that can easily withstand the heaviest loads. Properly woven elements form a powerful support. Depending on the weaving option, only a certain structure is chosen for special requirements and tasks. But even the strongest steel rope can break, after which it becomes necessary to create a loop at the end. And you can weave a steel cable yourself, even in the field.
Purpose of steel cable
In most cases, steel cables are the main load-bearing element of transport, lifting and road mechanisms. They have found their application in such industries as oil refining, coal industry, agricultural and transport engineering, construction industry, river and sea transport. Steel cables are selected for use depending on the nature and weight of the load.
The main area of use of cargo steel cables is traction and lifting industrial mechanisms. These are overhead cranes, drilling devices, guy wires for various operational purposes, excavators, ship lifting systems, oil production devices. To move objects with people (lifting mechanisms of mines, elevators), cargo ropes are chosen.
Reinforcing steel ropes are used mainly for reinforcing reinforced concrete structures. Also in construction, steel cable is used as load-bearing elements of various structures and an auxiliary element of earth-moving equipment. Thanks to its reliable design, the steel cable can easily withstand the loads exerted during construction operations, for example, lifting concrete slabs to a height.
Rope slings are also made from metal cable - flexible load-handling devices that are necessary for suspending cargo to hooks and other working parts of a lifting machine. Slings are used when performing loading and unloading operations and transporting particularly large loads, which contain special loops, eyes and clamps for gripping.
Steel cable design
A steel rope is a flexible metal product that is made from steel wire and consists of strands twisted together. High-carbon galvanized wire usually has a diameter of 0.4 - 3 millimeters with a tensile strength of 130 - 200 kgf/mm2.
The cables have a core in the middle. The rope is coated on top with aluminum or zinc to impart stainless properties. The core plays the role of internal support for the strands, protects them from falling through to the center and is needed to resist the radial pressure of the cores under loads on the rope, preventing transverse deformation of the product. It is made from different materials: metal, organic, natural or synthetic.
Organic cores are made from hemp, sisal, manila or cotton fabric, they help to form the round shape of the rope and, when impregnated with an anti-rot lubricant (gun grease, petroleum jelly, rope wax), reduce friction between the wires. Mineral cores are made from asbestos and are used in cables that are designed to operate at high temperatures. During the use of the steel rope, the lubricant with which the mineral core is impregnated penetrates into the spaces between the wires, while protecting it from corrosion.
It is customary to use thicker wire for the outer layer, so steel rope is indispensable for work involving friction or in chemical environments. The zinc coating of the wire, which improves the performance of the steel cable and protects the rope from rusting, comes in three varieties: LS - for light conditions, SS - for medium conditions, ZhS - for harsh conditions and use in sea water. The wire is produced in three grades: I, II and B. The highest quality wire, which has great mechanical strength and toughness, is the material of the highest grade B.
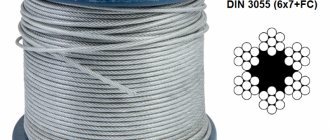
The design of the cable is indicated by three numbers expressing the number of strands, the number of wires in the strand and the number of organic cores. For example, an entry of this type “6 X 37 + 1 OS” means: a six-strand cable that has 37 wires per strand and one organic core. The more wires in a strand and the smaller their diameter, the more flexible the steel cable will be.
Steel ropes, in addition to significant load-bearing capacity, are highly flexible. One of the undeniable advantages of such cables is their resistance to sudden dynamic loads. Since wear of these products occurs gradually, you will be able to identify defects in these devices in a timely manner.
Types of construction cables
Depending on the number of wires in the cable, steel ropes come in different flexibility - less flexible ropes of 42 wires; flexible steel cables made of 72 wires, each strand has 12 pieces around a hemp core; products of increased flexibility, which are twisted from 144 thin wires in each strand, 24 around a hemp core.
Steel cables are divided into three types according to their design:
- Single lay ropes consist of one strand, the wire of which has the same diameter and is twisted in one or several layers (up to four) in a spiral around one wire.
- A double lay cable is called a wire rope cable. It is made by twisting several strands in one or two layers around a single metal, mineral or organic core.
- Three-strand cables are woven from several cables, which in this case are called strands. Strands of triple and double lay ropes consist of wires that can have the same or different diameters.
According to the level of twist, steel cables can be either spinning or low-twisting. According to the material of the rope core - with a metal core (single-strand steel and steel wire) and with an organic core (fiber, natural, synthetic, fiber, fiber reinforced).
According to the combination of laying directions of steel cables and its elements, ropes are:
- one-sided lay: the direction of the rope and the lay in the wire strand are the same;
- cross lay: the direction of lay of wires in strands is opposite to the direction of lay of strands into a rope;
- combined lay: with simultaneous practice in the rope of strands of the left and right directions of lay;
- triple lay: cross lay with the opposite direction of lay of wires and strands.
Using steel cable
I would like to warn you in advance against using very thin ropes, although the price of a steel cable in this case will not be too high. Also remember that the thinner the wire, the more the cable is subject to wear and corrosion. The most corrosion-resistant cables are those made from stainless or galvanized wire. Cables made of copper-plated or non-galvanized wire can quickly become rusty and destroyed, especially in bend areas.
The most reliable and functional in operation is galvanized steel cable. The method of its manufacture consists of a specific weave of steel wire of various transverse diameters. In addition, the core, which is located in the central part, is coated with a special lubricant and anti-rot impregnation to enhance resistance to various types of influences.
The main task of caring for a steel cable under the conditions of their use is to preserve the structure and shape of the product that was given to it during manufacture, and to protect it from corrosion and mechanical damage. When storing a rope that is wound on a drum, its axis should be parallel to the floor on which the drum is installed.
During long-term storage, products should be periodically inspected on the outer layer, and rope lubricant should also be applied to them as a continuous continuous film. Torsiol-55, Torsiol-35, GOST 20458-75, BOZ-1 according to technical documents can be used as a lubricant. Before applying lubricant, the cable must be cleaned of dirt and old lubricant in various ways. The easiest way is to clean with cotton ends and steel brushes. When applied to the cable, the temperature of the lubricant should reach 80-100 degrees Celsius.
Steel cable braiding
Of course, steel ropes have greater strength. However, if you have identified a break in the steel cable, you need to carry out work to repair it, which begins with inspecting the rope. Where there is a break, the ends should be removed with metal scissors or wire cutters. The main thing is that the ends of the rope are cut straight.
To do this, the cable is placed on the edge of an I-beam or channel beam and picked out with a hammer. Or cut off unnecessary parts with a cutting wheel, if you have an angle grinder, and dispose of them. For safety reasons, it is recommended to carry out all work with the cable using mittens or gloves.
The cable must be unbraided to a length of 60-80 centimeters and divided into strands. Then one strand must be bent at a distance of 30 centimeters from the whole part of the cable and braided with another, moving towards the main part of the steel cable. Using a pry bar, the rope needs to be braided one or two more turns with the free end. Similar actions should be done with the following strands. The loop will end up with ugly ends sticking out.
Wrap one end around two intertwined branches and hide it; wind the other end in the opposite direction. Better yet, braid the existing three parts, giving them the shape of a regular braid. Using the third strand, you need to wrap the braid, weave it into a loop and wrap it around the braid again. The procedure is continued as long as there are free ends, each rod is directed towards the previous one and their ends are brought inside the braids.
To avoid injuries and ensure greater reliability, it is recommended to secure the pigtail in several places with clamps, the role of which can be played by pieces of steel wire, which are tightly wound with pliers and hidden inside the pigtail. At the end of the work, for safety reasons, the braid is wrapped with insulating tape; this is shown in the video on how to braid a steel cable.
To obtain a strong and reliable connection in the process of weaving a steel cable, you need to create a uniform load on the strands and strive for their symmetrical laying. Moreover, this is true for different types of steel ropes. During work, it is recommended to periodically crimp the weave areas.
Creating a loop on the cable
In some situations, it becomes necessary to learn how to braid a loop on a steel cable - when lowering submersible pumps, to create a guy wire for the antenna and tow rope. It will not be possible to tie a knot from a steel rope due to its rigidity. But you can make a fairly neat loop at its end. As with braiding a steel rope, you need to cut off the ends of the frayed cable. Place the cable on a solid base and hit it with the sharp end of a hammer several times in one place. You can use a grinder for this purpose.
As a result, you will get a smooth, neat end of the rope without kinks. Unravel the steel cable approximately 60-80 centimeters. Using a screwdriver, you need to divide it into two parts according to thickness. With a 7-strand rope, there should be 4 strands in one part and 3 strands in the second part. Wrap both parts around each other and make a loop about 10 centimeters in diameter at the end of the steel cable.
In this case, take into account the reduction in the diameter of the rope loop during the weaving process by the thickness size. To form a loop, the main 4-strand part of the steel cable must be bent towards the 3-strand part. Place the second part of the cable in the grooves of the main part of the rope.
Twist the remaining ends of the two strands that are woven around the cutting alternately. Next, wrap each of the four free strands one by one around the handle, then weave this strand into a loop and wrap it around the handle again. To securely seal the loop, ensure that at the end of the cable each strand passes into the loop, in relation to the previous one, in the opposite direction.
Cover the ends of the previous strands of steel rope with subsequent ones until two strands remain free in your hands. Carefully insert them between the strands of the cable loop using a screwdriver. Wrap this area with insulating tape. They can also be embedded into flattened tubes. In this way, you can hide the ends of the steel cable and make the loop on the rope less dangerous.
Fire on a steel cable
Before making a fire, you need to apply a strong temporary mark at a certain distance from the end of the steel rope, secure the ends of the strands with marks, and then unravel the end part of the cable on the strands. Then the cable should be laid in the form of a loop of the required size and the running strands should be punched. There are many punching techniques, but we will consider only the most common method.
It is convenient to carry out the first punching if the fire turns its curved part towards the worker, and the running strands are placed on the right. Place the first running strand into the cable against its descent from right to left, under the 3 main strands. The second and third strands are pierced under two and one strands, respectively. When you have punched the first 3 strands, you need to turn the fire over, and then punch the 4th and 5th running strands.
The fourth strand is pierced under two, and the 5th - under one strand of the steel cable. Then you can turn the fire over again and give it its original position, punch a sixth running strand into the cable, which is inserted under one strand of the steel product in the direction of its descent. This completes the first punching procedure.
During subsequent punching, each running strand is inserted from right to left into the rope according to the rule “one strand under two.” At the end of each punching process, the strands should be tightened, which can be done, depending on the thickness and strength of the steel cable, manually or using hoists or a vice. To reduce the thickness of the steel rope at the punching point, it is recommended to punch three strands four times, and the rest three times. Cut off the ends of the running strands near the rope itself, after which the product is tied with tinned wire.
The rope is a complex wire product, a great responsibility rests on its shoulders, so the quality of the steel rope must be at its best, and it is so important to know how to properly braid a steel cable or make a loop and fire on it.
Special designs for steel ropes
Some applications, such as narrow openings in drums or other complex feed systems, may require special end preparation. The end pieces must be removed after the cable has been installed. Brackets are used when another rope is needed to pull the new rope into place. The wire rope must not be shortened, lengthened or interrupted by the knot.
At the ends of a wire rope, staples , or end blanks, are used when another rope is needed to pull the working rope into place. Four commonly used pockets are shown.
Special designs
Attaching the safety rope
A safety rope is a necessary additional safety measure that should be used when it is not possible to secure a safety belt to a structural element. Must be equipped with a fastening device that will ensure ease of installation and removal, rearrangement and changing the length of the slings.
Fastening parts must be designed for a load of 2200 kgf, have anti-corrosion properties or a protective coating, and also not lose their properties when operating in the temperature range from -45 to +50 degrees and a relative humidity of 100%.
The insurance is attached to a belt that the employee wears. For quick fixation, a carabiner is usually used.